
Loading...
Loading...
Loading...
Loading...
Loading...
Loading...
Loading...
Loading...
Loading...
Loading...
Loading...
Loading...
Loading...
Loading...
Loading...
Loading...
Loading...
Loading...
Loading...
Loading...
Loading...
Loading...
Loading...
Loading...
Loading...
Loading...
Loading...
Loading...
Loading...
Loading...
Loading...
Loading...
Loading...
Loading...
Loading...
Loading...
Loading...
Loading...
Loading...
Loading...
Loading...
Loading...
Loading...
Loading...
Loading...
Loading...
Loading...
Loading...
Loading...
Loading...
Loading...
Loading...
Loading...
Loading...
⚠️ This documentation is outdated! A current version is available at openhdfpv.org
Two Raspberry Pis, two supported WiFi adapters, one Pi cam (Or CSI-HDMI adapter), and 2 good quality (preferably industrial micro SD cards).
Please read the rest of the documentation and do your homework when you make your purchases! Only specific WiFi cards will work due to the unique system requirements. Good results are only achieved with proper power supply and wiring!
On a Raspberry Pi, 100ms “glass to glass”. Although most setups are in the 125ms range.
The easiest way to reduce latency is to use OpenHD on a "potent" X86 Laptop, it'll reduce the latency a lot. (This was tested on a "hp omen en1179ng" )
On a Jetson Nano as Air-SBC you can expect to lower the latency, but no official numbers are published yet.
The lowest latency can be achieved on our custom hardware combined with a X86-Ground. There are no official numbers yet, but you can expect to cut your latency in half, which makes OpenHD repsonsive enough to fly on race/freestyle-setups. It's not released yet, but you can follow our progress .
It depends. 1-3KM is easy to achieve, even with low power WiFi cards and the antennas that come with them.
Carefully chosen WiFi cards, antennas, and optionally an antenna tracker should put 20km+ within reach. The current record is 75km on 5.8GHz frequency with a 30dbi gain panel antenna.
YouTube video of
YouTube video of
OpenHD is optimized to regain the connection fast and without interaction, the time it needs to reconnect is very low (can be counted in ms).
OpenHD does not generate a solid blue screen when interference is encountered. When experiencing a loss of signal, you will see progressive artifacts and pixilation, finally the image freezes. The telemetry and/or RC link is more robust and will often continue to operate well beyond the loss of the video stream.
OpenHD generally operates in 5.8GHZ, but can also use the 2.4GHZ band (depending on your setup), which should allow you to choose a band your RC transmitter isn't using. You can also send RC control commands through OpenHD itself and thus avoid using 2 different transmitters. There are tradeoffs however. Control latency might be slightly higher than a dedicated RC system and there are currently some limitations on the channel count (16channels maximum).
If you're planning a long range flight and want to have the "best" setup for range, we advise you to use the OpenHD control link, since even with carefully seperated frequencies the range can be affected by any radio signal due to the increased noise floor.
A computer on a single circuit board. In this case running a derivative of Linux. Don't worry, you do not need to know anything about the software side. We have that covered!
No, just one adapter for ground and one for air. You can optionally use 2 WiFi adapters on the ground side for diversity, which improves signal reception.
In OpenHD > 2.2 most of the code has been rewritten. This means that we're much less hardware bound and support for new SBCs could be added in the future. Officially we currently differentiate between air and ground.
Ground:
The most optimized Platform on the ground is the Raspberry Pi, but if you have quite capable hardware, x86 will give you even better latency than the Pi.
Air:
The lowest latency platform is our custom hardware. The second best latency will be achieved with on Jetson Nano (which as limited camera support). The most flexible platform will be the Pi, but it can only encode h.264 video, which will result in increased latency.
Officially we can not support every platform, but we optimized OpenHD to be enable being ported to different SBCs.
You can also run the groundstation (including QOpenHD) on different platforms, but since every SBC handles decoding/compositing/rendering differently, we can't really optimize everything and the workload for our devteam is limited. Therefore we only officially support Pi and x86 on the ground.
See .
Only a few WiFi adapters are able to work the way OpenHD needs them to, which limits the selection of WiFi adapters you can use. We use a custom kernel, which requires drivers for each new card. Basic requierements are monitor mode and packet injection. If the card is stable in both modes and the injection rate is high enough, we can potentionally integrate it.
The built-in WiFi chip on the Raspberry Pi does not work the way OpenHD needs it to for video broadcast, however it can still be used for hotspot purposes, which allows you to connect Android and other devices to the ground station over normal WiFi in order to receive the video signal.
Jetson Nano does not have an included WiFi-card, so it can't be used to create a hotspot. You can use usb-tethering or ethernet though.
There are many possible causes of interference.
You might be experiencing interference from normal WiFi devices nearby. If that is the case, try another frequency or change your physical location. In most cases if you are outside in a suitable location for flying, there are not many normal WiFi devices around.
If you have a long CSI camera cable attached, it may be generating or receiving interference. You can test this by wrapping it in copper foil or getting a shorter cable. The kind of interference you will see in this case is very specific, it will look like perfectly straight vertical lines.
The AirPi and GroundPi may also be too close to each other, if you are testing on the ground. This can cause the receiving WiFi card to be overloaded.
It is generally necessary to solder power wires and even the USB data wires directly to the WiFi adapters and Raspberry Pi. The Raspberry Pi's USB ports are not capable of supplying enough power to power hungry WiFi cards. In some cases the USB connectors can briefly disconnect during flight, which might lead to total video loss. If you are still seeing interference or even video freezes, this should be the next thing for you to address.
In OpenHD 2.3 you can get low power warnings when your BEC is not able to supply enough power. Please change it to a more powerful one. In addition to that, carefully check and wire the WiFi cards correctly in order to avoid power issues.
Two WiFi adapters on the Ground are supported.
eBay
Amazon
banggood.com
Due to the global chip shortage it is currently not that easy to buy all the required hardware. Try to use or buy used hardware.
Keep in mind that OpenHD 2.3 dropped support for Pi-Zero, Pi1 and Pi2 (lower than 1.2).
OpenHD uses normal WiFi hardware, which is perfectly legal to buy and use.
OpenHD can be disruptive to nearby WiFi networks due to the continuous broadcast though. OpenHD starts at 25mW transmit power, which is allowed in every part of the world. It can be configured to use power levels and frequencies which might not be legal in your location, so please check your local regulations before use.
You are responsible for your use of the system, but please ask us for advice if you are concerned about a particular setting or use case.
Yes, you can receive the video with any GroundPi that is configured to the same frequency as your AirPi.
In future releases we'll add a "BindMode" which will only allow people with a passphrase to view your video.
A way to improve the reliability and quality of video reception.
Diversity is currently not enabled in 2.2, but will be added in later versions.
If you connect 2 or more WiFi adapters to the GroundPi, whichever adapter is currently receiving the best signal will be used. This is entirely automatic and occurs in realtime. You do not have to change any settings or monitor anything.
Some OpenHD users connect different kinds of antennas to the 2+ WiFi adapters, such as a directional antenna and a normal omnidirectional antenna. This allows for automatic switching from long range to short range, so that you don't have to keep your directional antenna pointed towards the UAV when it is nearby.
FEC is a way to add redundancy to the video stream.
Since the latency must be kept to a minimum, there is no opportunity to retransmit parts of the video that were distorted by interference. Instead, the system will process the video in a way that allows for some of the data to be lost in transmission, without affecting the received video on the GroundPi.
There is a cost to using FEC. The radio bandwidth is a little bit higher (or viewed another way, the maximum video bitrate/quality is a little bit lower). However it is mandatory for safe flight. Without FEC, the video would be very easily distorted.
In OpenHD 2.2 we started to highly focus on latency. The first releases will have a pretty average latency, but currently we're saving every ms we can. With 2.3 we returned to the same latency, which ez-wifibroadcast had, which was significantly lower than previous OpenHD releases. Thanks to the use of h.265 video encoding (not available on Raspberry Pi) and custom hardware we are able to reduce the latency even more.
See
We reduced the RC protocols down to only MAVlink, since nearly every FC firmware supports MAVLink.
We reduced the telemetry protocols down to only MAVlink, since nearly every FC firmware supports MAVLink telemetry.
This is a shorter way to refer to which SBC is transmitting video from the UAV and which SBC is transmitting RC and/or uplink telemetry. Both are using the same OS images.
Circular antennas are known to be very effective in suppressing signal reflections (multi-pathing), which degrades the quality of analogue transmission.
Digital systems are not affected by multi-pathing though (and often can take advantage of it). Circular antennas are not as important as they would be with an analog video system.
However, circular antennas still have some advantages compared to linear antennas:
They work independent of angle to each other, almost no polarization losses.
Typically circular antennas have a lower gain, and thus higher opening angle than linear antennas.
Less susceptible to signal blocking from nearby solid objects.
Use the system! There are a lot of different features, settings and possible hardware combinations, it can be very difficult to test everything each time we release an update. As a result, we depend on users to tell us when something is wrong or if something should be improved.
If you have any development experiences and time, we're always open to new developers which want to help improve and extend our codebase.
We also frequently need translators who can read/write both english and another languages, as the system supports translation in the OSD.
And of course if you have an idea for something you would like to see us add or change, let us know in Github issues, on the Forum, Discord or on Telegram.
If you want to support the project financially, you can do so via .
TaoBao (chinese marketplace)
Not every USB-port is able to supply the Wifi-Adapter with enough power. Please ensure enough power is supplied to the WiFi adapter before flying. The standard 500mA isn't enough. Also, if you do any PowerMods, we're not responsible for any potential damage.
Older computers or SBCs may not be fast enough to run OpenHD.
Most SBC's have very limited camera support (since cameras need to be specifically adapted to the ISP) and doesn't make sense using as Air, which is a shame.
⚠️ This documentation is outdated! A current version is available at openhdfpv.org
On this page we're documenting, the most appearing "bugs/issues" and how to fix them, also we're adding a little troubleshooting information, which will help to understand and document the issue you're having.
In the newer Realtek drivers the LED isn't controllable anymore, meaning we can not turn it on to show that the device is working.
Since we can not control it, blinking or not even turning on the LED is no indicator of the device or software is malfunctioning.
In evo we do not have any display-stats or indicator that the software is running. It'll show up a regular Terminal for debugging. OpenHD is setup to automatically setup and connect. On the Air you just get a Command Prompt and no interaction is needed.
If you want to see if openhd is running, you can type in "systemctl status openhd", this will show some stats.
OpenHD is setup to automatically setup and connect. On the Ground you should get QOpenHD (our OSD). If it didn't you may have made an error while flashing, please remember selecting GROUND while writing your SDCard.
With OpenHD evo we stopped support on some platforms, all ARMv6 devices are not supported anymore.
We don't have extended i2c settings for veye cameras, since veye didn't integrate them in standard v4l2 controls.
If you need special drivers and need to use KMS as the display driver, we can not support that, since low latency modes are only available on FKMS.
Make sure all your devices are powered via seperate BEC's and you have a keyboard available
You can check the status of openhd with "systemctl status openhd"
For better debugging please download the journal from our webinterface and provide it when contacting us in our Telegram Chat.
Flashing Your Air and Ground Units with OpenHD Firmware
⚠️ This documentation is outdated! A current version is available at openhdfpv.org
A Windows or Linux PC (Alternatively, see "Manual Install" below).
a) An SD card reader and a high-quality SD card with a minimum capacity of 16GB (Raspberry Pi only needs 8GB).
b) A high-quality USB cable (required for hardware with internal memory, e.g., Ochin & CM4 with eMMC).
Step 1: Download and install the latest OpenHD ImageWriter, which is based on the Raspberry Pi Imager, from and .
Step 1.1 (Only for CM4 with eMMC): If you're using the Ochin,or any other CM4 carrier you first need to install your CM4 into the carrier board and flash it. Some boards requires external power even when the usb-c is connected. To enter the "flash-mode" push the Button while connecting power. Now you can continue with the normal setup shown in this Video. And when it comes to flashing jump to the next Step
Keep in mind, flashing is very slow, because some limitations of the RPi-Foundation. Do not disconnect while flashing, it can brick your device.
Step 2: Open the image writer and select the latest OpenHD release from the drop-down menu. The image writer will automatically download the selected image. Alternatively, you can manually download the image and flash it using the "Custom image" selector. Ensure you unzip the image externally first and then select the .img file (not the .zip file).
Step 3: Insert your SD card into the card reader, and select it from the "Choose storage" option. If you are using a CM4, it will appear as an SD card.
Step 4: Click on "Settings" in the lower-right corner and choose either "Air" or "Ground," depending on whether you want to flash an air or ground image. This step is essential for a functional OpenHD setup; you need to flash one Air unit (select air) and one Ground unit (select ground).
Step 4.1: In this step you can also select a binding phrase to improve the protection of the link (its not mandatory) both binding phrases on air and ground need to be the same (you CANT change it after without a reflash of both air and ground sds), if you want to use it just click on "set binding phrase" and write the phrase (max 10 characters)
Step 4.2: For ground the settings are quite simple, just click on ground and then "SAVE"
Step 4.3: For air you need to select "air" and then the camera you want to use (you can change it after that on the settings) also you need to click "SAVE" when you have finished
Step 5: Flash your image by clicking on "Write." This process may take some time.
You can always flash OpenHD images using the flashing tool of your choice. In this case, you must manually specify whether you want to boot as an air or ground unit after flashing. For an air unit, create a file called "air.txt" under /boot/OpenHD/. For a ground unit, create a file called "ground.txt" under /boot/OpenHD/.
Note: Filenames are case-sensitive. If you wish to switch from air to ground, it is recommended to reflash your image and then create the appropriate "air.txt" or "ground.txt" file.


⚠️ This documentation is outdated! A current version is available at openhdfpv.org
OpenHD custom hardware is an ongoing project that is currently being developed and funded through https://www.patreon.com/OpenHD. The project aims to create a small and modular wireless high-definition video transmission system that is capable of transmitting and recording video in various resolutions and framerates with low latency capabilities.
The system is specifically designed to fit into the standard 30.5x30.5mm FPV drone stack system, making it easy to integrate into existing drone setups.
The project team is currently working on refining the design and improving its performance. The custom hardware system will be optimized to work with OpenHD and run specially created software.
It's worth noting that the OpenHD custom hardware project has already progressed beyond the conceptual stage and the team has developed several prototypes. These prototypes are currently being tested and refined.
If you would like to learn more about this project and stay up-to-date on its progress, be sure to visit . The team is always looking for new supporters and contributors to help bring this exciting project to life.
⚠️ This documentation is outdated! A current version is available at openhdfpv.org
The ochin_CM4v2 board is a carrier board for the Raspberry Pi CM4 module, designed to expose the connections to the peripherals made available by the CM4 module.
This summary is intended to facilitate the installation and use of the ochin_CM4v2 with OpenHD software.
For more detailed documents, please follow the official GitHub links:
• 4x USB 2.0 480Mbps (4x SM04B-GHS-TB(LF)(SN) connectors)
• 1x USB Type-C (for flashing eMMC)
• 2x CSI camera (2x FH12-22S-0.5SH (55) connectors)
• I2C1 (SM04B-GHS-TB(LF)(SN) connector)
• SPI1 / 6 (SM06B-GHS-TB(LF)(SN) connector)
• UART0 / 1 + Video Out (SM06B-GHS-TB(LF)(SN) connector)
• UART4 / UART5 (SM06B-GHS-TB(LF)(SN) connector)
• 1x Ethernet transformerless 100Base-T
• 1x microHDMI
• 2x general purpose LEDs
• RGB LED on external tiny board
• 1x general purpose button on external tiny board
The ochin_CM4v2 now supports the uHDMI video output. It is designed to be used both on the “air” and on the “ground” side.
The ochin_CM4 does not have a slot for the microSD; it is mandatory to use Raspberry Pi CM4 modules with eMMC (not lite).
The Raspberry Pi CM4 module gets pretty hot very quickly, please use an adequate heatsink.
The ochin_CM4v2 board is equipped with a 5VDC switching regulator necessary to power the CM4 module and all the peripherals connected to it. The regulator can accept input voltages from 7.5VDC to 28VDC (LiPo from 2S to 7S) and provide output currents up to 7A. It is possible to use the VBUS of the USB ports also to power the WiFi module. The board is equipped with a current switch that cuts the VBUS for currents higher than 3A to protect the CM4 module. It is possible to bypass the current switch if more current is needed on the VBUS, waiving the VBUS safety (see the ochin_CM4 board manual).
The CM4 connectors are delicate and dense. Ensure no dust or debris is on the connectors before positioning the CM4 module. Gently place the module on the connectors until they snap into place. Press the two long edges of the CM4 module until the connectors are fully inserted. Limit disassembly to avoid damaging the connector contacts.
To remove the CM4 module from the ochin board, use the proper extractor. The .STL files for printing the extractor can be found in the “3D” section of the GitHub repository.
Power up the board with boot configuration as a “mass storage device”.
Power off the board (no Vin connected)
Press the “nRPiboot” button on the tiny external board and, keeping it pressed, power up the board using the “Vin” Connector.
Run the “RPiboot” software, downloaded from the Raspberry Pi . The PC will see the eMMC partition as if it were an SD card in the SD card reader.
Flash the eMMC using the OpenHD imageWriter.
The CSI camera can be connected to one of the two FFC connectors. The copper contacts of the flat cable must be oriented PCB-side.
The WiFi dongle can be connected to one of the 4 USB connectors on the board. It is advisable to cut a USB extender and solder it to a GHS connector, keeping the wires on the connector side as short as possible.
To connect the telemetry to the FC, use one of the available UART ports. The default UART is UART0 / 1. Ensure that the logic levels of the FC UART are 0V-3V3, as the GPIOs of the CM4 module are not 5V tolerant.
.
The CSI flat cable is very close to the USBs and is prone to RF noise. It’s suggested to shield the flat cable with copper tape (or at least alu tape).
The USB WiFi dongle will draw some Amps, please use supply cables of adequate size between the ochin_CM4 board and the USB dongle.
⚠️ This documentation is outdated! A current version is available at openhdfpv.org
HDMI cameras require the MMAL Overlay.
To use an HDMI Camera, you need an HDMI-CSI Adapter. These adapters enable you to connect cameras with HDMI outputs, allowing the use of a wider variety of cameras beyond the usual Raspberry Pi camera sensor boards. Depending on the camera, this may result in improved picture quality, including support for features like WDR.
Most small/cheap Toshiba chip boards support up to 1080p25 or 1080p30 HDMI camera resolutions on most Raspberry Pi models. The Raspberry Pi Compute Module boards are technically capable of 1080p60, but the necessary driver change to support 1080p60 has not been implemented yet.
Note: If your camera only supports 1080p60 or 4k60 HDMI output, it will not work with the Toshiba boards.
A latency test was conducted by Bortek using the Auvidea B102 with a GoPro4 camera.
GoPro4
SJcam M10
Canon EOS 700D
Cameras That Do Not Work:
Samsung NX500 (1080p60, framerate too high)
Canon EOS M (1080i, interlaced output is not supported by these adapters)
AliExpress link:
This adapter is widely used for OpenHD. It's available through AliExpress and Taobao. Users in the U.S. or Europe may experience delays in obtaining them. For those regions, consider the similar geekworm board mentioned below, available on Amazon.
The adapter is compatible with both Raspberry Pi Zero and full-size Raspberry Pi models, setting it apart from other cards.
Available on Amazon in the U.S., this adapter is similar to the DCDZ adapter mentioned above. Amazon store link: Geekworm store link:
The adapter is compatible with full-size Raspberry Pi models.
More info:
The Auvidea B102 shares similar capabilities with other adapters, but it's only compatible with the Pi Zero.
More info:
Similar to other adapters, the Auvidea B101 is compatible with full-size Raspberry Pi models.
More info:
This more complex (and expensive) card supports HDMI like other adapters, as well as analog component input. However, it's unlikely that any drone-worthy camera uses component connections. The adapter includes LEDs to indicate the status of the camera connection.
A drone-specific HDMI camera with onboard recording to MicroSD, WDR support, and a weight of 60g.
Note that some cameras were shipped without HDMI output. The provided link is reported to be the correct HDMI model.
CMOS
Good WDR
$75
Unknown
Good WDR
$75
⚠️ This documentation is outdated! A current version is available at openhdfpv.org
OpenHD supports and recommends the following cameras on the Raspberry Pi:
*This cameras use mainly raspivid which is legacy and discontinued. These cameras aren't really recommended for FPV, since V1,V2 of Raspberry cameras do not provide a good image outdoors, and the HQ camera is much bigger and more expensive then smaller versions of it. V1 sensor is also not produced anymore and V2 sensor is about to follow.
More information about CSI-HDMI can be found .
Cameras not listed here may potentionally work, but aren't tested and configured.
We only integrate Cameras which are tested and fitting to the purpose of openhd. If you want to get new cameras supported ask your camera vender to support OpenHD development with their hardware, but contact us first at developer@openhdfpv.org
We also want to thank our cooperation partners for providing the Team with Prototypes and want to specifically thank for helping us in developing cameras specifically to our need.
High Quality
$37
libcamera_imx519
Arducam
low weight,small
$37
libcamera_imx477
Raspberry Pi Foundation
Normal
$25
MMAL
Raspberry Pi Foundation
Normal
$25
MMAL
Raspberry Pi Foundation
HQ
$50
MMAL
Arducam
Normal
$75
libcamera_imx477
Arducam
Low Light
$60
2
Arducam
HQ Mini fixed focus
$35
libcamera_imx519
Arducam
Low Light
$30
libcamera_imx290
Arducam
Low Light
$30
libcamera_imx327
Arducam
Ultra Low Light
$60
libcamera_imx462
VEYE
Low Light
$90
veye_cam2m
VEYE
Low
Germanium
iRay
384x288
25hz
Infiray T2 search
Germanium
iRay
256×192
25hz
FLIR Boson 320
Germanium
FLIR
320x256
9hz/60hz
FLIR Boson 640
Germanium
FLIR
640x512
9hz/60hz
4
up to 1080p@30fps
Arducam
Highest Quality
$37
libcamera_imx708
Arducam
Hti-201
Chalcogenide
Raytheon
320x240
9hz
2
up to 1080p@30fps
2
up to 1080p@30fps
While many cameras can potentially work, latency is the biggest issue. Please read the Camera pages to fully understand all variables.
When using multiple Cameras you need to choose one Camera-Subsystem, so you can not use libcamera and raspicam at the same time. This means f.e. you can not use an Veye-Camera and an Arducam camera at the same time.
When using multiple Cameras the second camera is using Software decoding and encoding, it is not recommended to use a high quality camera. It is generally made for a thermal camera or something with lower resolutions.
With the upcoming of many new camera's there is one thing we need to mention. OpenHD is not supporting ANY autofocus cameras, since they are basically not usable on equipment with vibrations (like drones), this also includes the Raspberry V3-lineup
Supported Cameras *
Can be enabled and used easily (No custom scripting), in case things don't work you can ask us for help.
Recommended Cameras **
Among the available options, we highly recommend the top 3 cameras as they offer unparalleled versatility and optimization for OpenHD. These cameras stand out for their exceptional image quality, low latency, extensive feature set, and suitability for professional applications. If you are currently without a preferred camera choice, these top recommendations are guaranteed to provide unique benefits and fulfill your requirements.
Hti-301
⚠️ This documentation is outdated! A current version is available at openhdfpv.org
OpenHD has the ability to automatically detect and utilize USB cameras that provide either raw uncompressed or pre-encoded (h264, h265, mjpeg) data streams. However, it's important to note the following potential limitations:
Fixed Encode Bitrate: Cameras with a fixed encode bitrate may not support features like variable bitrate. This could necessitate manual tuning of your connection settings.
Suboptimal Encoding Parameters: Some cameras might have encoding parameters that lead to issues such as increased latency or poor error recovery in your stream. Thoughtful adjustment of these parameters is recommended for optimal streaming performance.
RAW Format Challenges: Cameras that deliver RAW data require software-based encoding, which can impose constraints on achievable resolutions and frame rates. This limitation persists even on powerful platforms like the Raspberry Pi 4.
By being mindful of these potential challenges, users can make informed decisions about camera selection and configuration to ensure the best possible streaming experience with OpenHD.
⚠️ This documentation is outdated! A current version is available at openhdfpv.org
The Jetson Nano is a capable H265 encoding device, that's why we supported it in our 2.2-evo till 2.3-evo releases. Since it is fundamently different and doesn't give any advantage on the Ground, we do not officially support it as GroundSBC.
Since Nvidia refused to update the Jetson SBC's at all and their software is totally outdated. We decided to discontinue Jetson Support. However experienced Developers can build and maintain their own Jetson images.
Previously Supported Jetson-SBC's
⚠️ This documentation is outdated! A current version is available at openhdfpv.org
As OpenHD continues to evolve and introduce new features that require enhanced performance, we have made the decision to discontinue support for certain hardware that was previously compatible with earlier versions.
The following Single Board Computer (SBC) models are no longer supported:
Jetson Nano 2GB
Jetson Nano 4GB
Raspberry Pi 1
Raspberry Pi CM1
Raspberry Pi Zero
Raspberry Pi Zero W
Jetson Nano 2GB
Jetson Nano 4GB
⚠️ This documentation is outdated! A current version is available at openhdfpv.org
The antennas are a key component for any radio link solution and the same for radio waves are applicable here. The right combination depends on the objectives, like short-range (all-around flight) or long-range flight for more advanced pilots. A good starting point is the default antennas for the wifi cards at the workbench (omnidirectional), once you get confident with the system during a line of sight and short flights, you can move with directional antennas.
As nothing is free, changing your antennas is a trade-off, while omnidirectional antennas give you autonomy to fly around your position, these antennas offer limited range, on the other side directional antennas concentrate the radiated pattern and allow a long-range at the cost of the need of pointing the antennas precisely, in other words, more antenna gains more directional. For the high directive antenna, add components like trackers are recommended to keep always pointing the main antenna pattern lobule to the aircraft.
Make sure you have proper wiring and you have followed all previous sections, wrong connections can lower your range or destroy your radio link.
Start simple using Omni antennas, and move with directional ones as you get more experience.
Make sure you use the same polarization on both sides, Vertical/Vertical, Horizontal/Horizontal. The cross-polarization can work but you will lose 3dB (half of the power).
Lower bands like 2.4GHz can benefit the range, however, in some areas, this band is highly polluted and you may consider 5.8GHz. Try changing also the channels in the selected band.
When using directional antennas (meant for ground side), always aligned with the airside, consider using ATT (automatic antenna tracker). Omnidirectional antennas are always recommended in the Airside.
The below link explains how the video quality is impacted under different scenarios.
*Links are only for reference purposes. It will be added more as users report, check the connector type in order to make sure it will fit to your wifi card.
A typical question is related to the maximum range, link budget or system range have relation to three main elements: Transmitter power, Antenna gains, and Receiver sensitivity. The next formula can be used to calculate this:
R_km = 10 ^ ( ( RF_HW - LM - 32.44 - 20*log10(f_MHz) ) / 20 )
RF_HW = P_TX + G_TX + G_RX - S_RX
where:
R_km is the transmission range in km f_MHz is the frequency in MHz LM is the desired system Link Margin in dB 32.44 is the Friis constant for solving with units of km and MHz above RF_HW represents the RF Hardware (Radio / Antenna) parameters in dB P_TX is the Tx power in dBm G_TX is the Tx antenna gain in dBi G_RX is the Rx antenna gain in dBi S_RX is the Rx Sensitivity in dBm
*Network card receiving sensitivity approx. -93dBm. Link margin assumed 10 dB
To understand the impact in range against the transmitter power, the below logarithmic graph shows some calculations using different antenna sets:
⚠️ This documentation is outdated! A current version is available at
Virtually any screen/monitor connected to the HDMI port on your Pi will work. Additionally, the following displays have been successfully tested:
Note 1: The type and model of your monitor will affect the latency since response time, picture enhancement, and refresh rate will add latency. The best latency can be achieved with low response time, gaming monitors with a refresh rate of more than 120Hz.
When using QOpenHD on embedded devices such as RPI or ROCK with displays exceeding 720p resolution, it may be necessary to manually adjust the screen scale, affecting the size of text and UI elements.
Navigate to OSD / Screen in the QOpenHD interface.
Locate the option to adjust the screen scale.
Recommended values for different resolutions:
≥720p: Default (1.0)
≥1080p: 1.5
≥4k: 2.0
On the Raspberry Pi, we're using the FKMS driver to enable low latency decoding. Some of the newer monitors require the KMS driver, which does not work with OpenHD. Only Official Raspberry Pi DSI monitors can use FKMS. Some DSI vertical displays are not supported since they are mnade to work vertically and cant be changed
Please note that the monitor has to be connected and powered before the Pi is powered on because the auto-detection only works at start-up. You can define your (custom) monitor resolution in config.txt statically to connect the monitor after the Pi is already running. Also, make sure to uncomment hdmi_force_hotplug=1 to enable "hotplugging" for your HDMI monitor/goggles.
Regardless of the monitor attached directly to the Ground SBC, you can use a phone or tablet running the official QOpenHD App.
Note 2: When using your phone or tablet, dual video doesn't work, and the latency might be slightly higher.
Warning 1: When using your phone/tablet as the only display (connected to the ground station), the viewing experience is less than ideal, and there might be stutters and lost frames.
In Evo, we added the possibility to use your existing laptop as a ground station. For this to work, you either need the USB-Image and boot from it or install OpenHD using the OpenHD X86 installer.
Warning 2: When using your X86 device, your experience (latency, framerate, etc.) depends on the power of your device. On more powerful devices, the latency is much less than on the Pi. On older/less powerful devices, it may be higher.
Note 3: Dual display setup isn't working because of the low latency video decode we use. On X86, it will work without issues. On the Pi, there is no capability to do so without adding a lot of latency.
Flat Panel FY-05A
Directional Vertical
5.8
Maple
Planar Antenna
Directional Vertical
5.8
Interline
Panel
Directional Vertical
5.8
uuustore
Flat Panel Antenna
Directional Vertical
5.8
Aomway
Biquad
Directional Vertical
5.8
DYI
Biquad Yagi Antenna
Directional
2.4
-
DYI
PCB patch array
Directional
2.4 / 5.8
Excellent upgrade for default antennas
Flat Panel Direct / 14dBi
Maple 5dBi / 5dBi
5.2GHz
200
8.2
Directional antenna with ATT
Planar Direct / 17dBi
Omni / 5dBi
5.8GHz
500
16.37
Directional antenna high range ATT
DYI
PCB Maple
Omni Vertical
5.2-5.3
Maple 5dB Omni / 5dBi
Maple 5dBi Omni / 5dBi
5.2GHz
200

Maple
2.9
⚠️ This documentation is outdated! A current version is available at openhdfpv.org
While it may seem like you could just connect the wifi adapter to one of the USB ports, supply power to the raspberry pi and go fly, it's not quite that simple. The success of your project depends on proper wiring and power supply.
Some lower power wifi adapter such as the TPLink 722n may work out that way, but others may not. If your wifi adapter needs more power than it is able to draw from the Raspberry Pi USB port, you will see "interference" that isn't really interference, dropped video frames, and potentially sudden video blackout. That could happen during flight if you don't take some simple steps to avoid it.
In addition, if the USB connection is briefly moved or subjected to vibration, it may cause the wifi adapter to reset or disconnect from the system, just long enough to completely stop the connection between ground and air.
The solution for those kinds of problems is to solder power from a BEC or other 5v power supply, to the wifi adapter(s).
It is also strongly recommended that you solder the USB data lines. On some wifi adapters this is easy because they have ready to use solder pads, or have a mini-USB connector on the adapter (in which case you don't have to solder anything to the adapter itself, just the other end of the cable).
use short wires
use wires with at least 20AWG gauge (0.5mm²)
solder everything, avoid any USB cables or plugs
Example of a raspberry pi powered through the GPIO pins (+ 5V -> pin 4 / ground -> pin 6) :
The 3A BEC can also power a 7" HDMI screen with a micro USB connector.
An exception is the 036NHA wifi adapter, you should solder the end of the cable that goes to the Pi but the adapter side can be plugged in normally
use a quality BEC with at least 3A
consider adding low-ESR electrolytic caps near the wifi adapters and the raspberry pi
do not use USB power banks
do not use the micro USB connection on the raspberry pi for power
do power the raspberry pi through the GPIO pins or by soldering power to the underside of the board
do make sure the camera cable is properly seated on both ends
On the raspberry pi zero, the camera connection is not very secure, especially if you have connected and disconnected it many times
You can secure the camera cable with some tape or a drop of hot glue
do make sure the raspberry pi and wifi adapters don't get hot
Consider adding small heatsinks, but be sure they will remain firmly attached with strong thermal tape
Keep the antenna away from the camera and camera cable
If you see straight vertical lines in the video, you may need to use a shorter camera cable or shield it with foil
The system can potentially interfere with 433Mhz, 868Mhz LRS, or GPS
If you encounter problems like this, consider separating, shielding or changing some of the components (ask us for help)


⚠️ This documentation is outdated! A current version is available at openhdfpv.org
INAV, short for Intelligent Navigation System for Aerial Vehicles, is an open-source flight control software designed to navigate and stabilize fixed-wing and multirotor unmanned aerial vehicles (UAVs), including drones and RC airplanes. Developed and maintained by a community of hobbyists and enthusiasts, INAV has gained popularity within the DIY drone and RC aircraft community.
OpenHD recommends INAV due to its user-friendly configuration approach, which makes it suitable for beginners, while also offering extensive flexibility for experts.
To establish a connection between INAV and OpenHD, there are different methods available:
Recommended Method: Utilize the hardware UART from your air unit (e.g., Raspberry Pi) along with one hardware UART from your flight controller.
Not Recommended: Use a USB cable on a flight controller that supports this approach (e.g., PX4).
Not Recommended: Utilize a USB-UART programmer.
By default, UART telemetry is disabled in OpenHD <2.5 . To enable it, navigate to the AIR(TMP) Settings registry using QOpenHD and select serial0. Be sure to set the correct baud rate that matches your flight controller. If you use 2.5 or higher versions telemetry is enabled from the start on Serial0.
Connect the TX pin of the serial port on your flight controller to the RX pin on the Raspberry Pi. Important: The Raspberry Pi uses 3.3V logic level on its serial ports, so ensure that your flight controller also operates at 3.3V. Connecting a 5V logic level may damage the Raspberry Pi's serial port. Refer to the Pinout diagram for pinout details.
Configuring INAV is straightforward:
In the Configuration tab of INAV Configurator, turn telemetry on. Click Save & Reboot.
In the Ports tab of INAV Configurator, select MAVLink telemetry and set the baud rate for the port you used on the flight controller.
Note that INAV reports its home position differently than the Mavlink documentation. Due to this, you may wish to enable the enable_dirty_inav_hacks option in OpenHD.


Setting Up Joystick RC Control
⚠️ This documentation is outdated! A current version is available at openhdfpv.org
WARNING: This feature is currently in beta. Please exercise caution and perform thorough testing.
OpenHD offers support for Remote Control (RC) input over MAVLINK, allowing you to connect a joystick (such as your RC controller in joystick mode) to your ground station via USB. This enables you to control your drone directly through the OpenHD wifibroadcast link.
NOTE: It's important to be aware that WiFi may not be ideal for transmitting many small RC packets. For the best experience, it's recommended to use a standard RC link operating on a different frequency than your OpenHD wifibroadcast link. For example, you can use 2.4GHz ELRS for RC control and 5.8GHz for wifibroadcast.
NOTE 2: RC over MAVLINK is supported by INAV, Ardupilot, and Pixhawk but is not supported on Betaflight.
NOTE 3: RC data is transmitted over the same UART telemetry connection between OpenHD and your Flight Controller (FC) as required for MAVLINK telemetry.
In QOpenHD, navigate to the OpenHD settings page, specifically the GROUND (TMP) section.
Set ENABLE_JOY_RC to true.
Reboot your ground station.
Connect your joystick to the ground station. For RC controllers, connect via USB and ensure you've selected Joystick mode.
Confirm that OpenHD detects and properly reads values from your joystick. In the QOpenHD interface, navigate to the RC section to view the current readouts. For example, if you're using a TX16s controller connected with AETR and 18 channels, you should see the input values.
OpenHD continuously sends RC joystick data as long as JOY_RC is enabled, and a joystick is connected. It will stop sending data if the joystick is disconnected, triggering a failsafe on supported Flight Controllers (TODO: validate).
You can adjust the update rate in the same settings screen where you enabled JOY_RC. Note that this setting is only available when JOY_RC is enabled. The update rate controls how many MAVLINK_MSG_ID_RC_CHANNELS_OVERRIDE packets are broadcasted per second.


Changing Camera Settings in OpenHD Evo
Settings do not work on unmanaged Cameras!
⚠️ This documentation is outdated! A current version is available at openhdfpv.org
OpenHD Evo provides you with the flexibility to adjust camera settings, such as resolution and framerate, in real-time without the need for a system reboot. These settings allow you to customize your video stream to meet your specific needs.
For Libcamera and Raspivid we have a lot of Picture settings to optimize your experience. These are located in the Camera Tab or in the sidebar
Example:
Note: While OpenHD Evo includes some user input validation, certain parameters cannot be fully validated due to the diverse range of hardware and configurations. Therefore, it is essential to monitor your video stream when making changes to settings like resolution and framerate.
If your video stream suddenly stops working or experiences issues, follow these steps:
Check the Log in QOpenHD: Look for error messages, particularly those mentioning "restarting camera, check your parameters/connection." This may indicate that you've selected an unsupported combination of settings.
Review and Adjust Settings: If you encounter errors, review your camera settings. Ensure that you've selected a supported combination of resolution and framerate for your specific hardware. For example, setting 720p resolution at 120fps on a Raspberry Pi may lead to issues.
By selecting a supported video resolution and framerate, such as 720p at 30fps on a Raspberry Pi, you can likely recover from errors and maintain a stable video stream.
Customizing camera settings in OpenHD Evo empowers you to optimize your video feed for various scenarios and requirements.


⚠️ This documentation is outdated! A current version is available at openhdfpv.org
In OpenHD Evo, there are two modes of Ethernet operation:
Passive (Recommended)
Active
In Passive mode, OpenHD's Ethernet is configured as a client, allowing you to connect it to a router or any device providing a DHCP server for seamless network integration.
Connect an Ethernet cable from your Linux device to the Single Board Computer (SBC).
Wait briefly.
Open a terminal and enter the command: sudo arp-scan --interface=eth0 --localnet (Replace ETH0 with the correct adapter connected to the SBC).
Record IP Addresses: Once connected, note the IP addresses of both devices:
SBC IP: For example, 10.42.0.118
Laptop IP: For example, 10.42.0.1
This setup will ensure that video and telemetry data are directed to your laptop's IP, enhancing your tethered OpenHD experience.
Connect an Ethernet cable from your Windows device to the SBC.
Search for "View network connections."
Access the settings of the network connection providing your Windows device with internet access.
Connect a suitable cable to your SBC; ensure it's a data-capable USB cable.
Go to your network settings, enable hotspot, and then enable USB Tethering.
All further configurations are done on the SBC.
Connect a suitable Ethernet adapter to your Android device.
Go to your network settings, enable hotspot, and then enable Ethernet Tethering.
All further configurations are done on the SBC.
Active mode is designed for IP cameras or connecting peripherals to the Ethernet port that do not have a DHCP server. In this mode, the SBC runs its own DHCP server, allowing devices to connect directly.
Test the connection by entering the SBC's IP address into your web browser; it should redirect you to the OpenHD web interface.
Configure Forwarding in OpenHD:
SSH into the RPI (user and password is openhd).Open the hardware.conf file located in /boot/openhd/ on your SBC. Modify the NW_MANUAL_FORWARDING_IPS IP address to point to your laptop’s IP:
Select your Ethernet connection with the SBC.
Wait briefly.
Use a software tool to scan for devices on your system (recommendation: Angry IP Scanner) to locate active devices.
Test the connection by entering the SBC's IP address into your web browser; it should redirect you to the OpenHD web interface.
(Sometimes not needed) Edit the hardware.conf on your SBC and add the Windows IP address to the forwarding IP addresses (usually 192.168.137.1).
This mode charges your mobile phone from the SBC; please note that Raspberry Pi devices may sometimes fail to boot when a phone is connected.
Some carriers and manufacturers may hide the tethering setting. If it's not visible due to the absence of a SIM card or other reasons, you may need to use a third-party app to enable it (recommended app will be provided later).
Some carriers and manufacturers may hide the tethering setting. If it's not visible due to the absence of a SIM card or other reasons, you may need to use a third-party app to enable it (recommended app will be provided later).
Active mode does not support sharing internet with the SBC.
# Specify additional IP address(es) for video and telemetry forwarding.
# OpenHD can detect external devices based on the connection and platform.
# Only applicable on ground units.

NW_MANUAL_FORWARDING_IPS = 10.42.0.1 # Replace with your Ground Station IP (laptop)Understanding Variable Bitrate in OpenHD Evo
⚠️ This documentation is outdated! A current version is available at openhdfpv.org
One of the primary objectives of OpenHD Evo is to introduce support for variable bitrate, aiming to align with other commercial FPV systems. However, achieving this goal can be challenging due to the diverse range of devices and setups that OpenHD supports, many of which may not inherently support variable bitrate at the hardware level. Here's a quick guide for both experienced and new users to navigate this feature.
Default Variable Bitrate (As of 2.3.2):
Variable bitrate is enabled by default in OpenHD Evo starting from version 2.3.2.
This means that OpenHD recommends bitrates to the encoder based on the selected link parameters and reduces the bitrate in the event of transmission errors.
Variable bitrate functionality is currently available for select cameras (see point 3).
Managing Variable Bitrate:
To mitigate the risk of overtaxing the link during flight, OpenHD Evo's default behavior is to automatically decrease the bitrate when necessary.
For experienced users who are familiar with their exact bitrate requirements, it's advisable to disable variable bitrate temporarily.
Camera Compatibility:
It's important to note that many cameras, especially USB cameras, VEYE, and the Raspberry Pi CSI to HDMI adapter, may not fully support variable bitrate.
To troubleshoot compatibility issues, observe the set and measured encoder bitrates. If you notice regular overshoots or undershoots, consider disabling variable bitrate and fine-tuning your link parameters to align with your camera's requirements.
Supported Wi-Fi Cards for Variable Link Rate:
The RTL8812AU chipset (and other chips using the RTL88xxAU or RTL88x2BU driver) are the only Wi-Fi cards that support variable link rates in OpenHD Evo.
With these cards, you can adjust the MCS index (modulation) and channel width (20MHz or 40MHz), which affects the throughput (rate) of your RF link.
Variable bitrate in OpenHD Evo enhances your flexibility in adapting your video stream to different scenarios. However, it's essential to be aware of camera compatibility and manage this feature effectively, especially if you are an experienced user looking for precise control over bitrates.
Navigate to "OpenHD -> Air(TMP)" and disable the option as shown below: 
After disabling variable bitrate, you can manually adjust the encoder bitrate in the CAM1 (and optionally CAM2) registry.
Dual camera setup process
⚠️ This documentation is outdated! A current version is available at openhdfpv.org
Dual camera refers to the usage of a primary camera (recommended: RPI CSI) and a secondary camera, e.g. a thermal Camera (recommended: USB Thermal camera).
To use this configuration, your hardware should fulfill the following prerequisites:
AIR: Use a Raspberry Pi 4 or at least a Raspberry Pi 3 - the USB thermal image needs to be scaled and encoded in software, which results in more CPU load.
GROUND: Similar to the air unit, the secondary video is decoded and displayed in a software-accelerated path. Use a Raspberry Pi 4 or x86-based hardware.
Configure QOpenHD (your Ground Control Station) to display 2 video feeds simultaneously. Your primary video is always full-screen, and your secondary video (previously called PIP) is in the lower left corner and can be maximized, minimized, or scaled to your liking:
Go to QOpenHD -> General -> N Cameras to control and set it to 2.
Restart QOpenHD.
Troubleshooting: In case any of your cameras are not automatically detected at boot, OpenHD will create dummy cameras for them to avoid holding up the boot process indefinitely waiting for cameras. Read the setup pages specific to your cameras if they are not detected (e.g., a dummy camera is created instead).
Configure OpenHD for dual-camera usage. After performing these steps, your air unit will wait for up to 12 seconds at boot for exactly 2 auto-detectable cameras to become available (default is 1). With variable bitrate enabled, it will automatically recommend a matching bitrate to the secondary and primary cameras (default split: 60%:40%).
2.1. Boot up your air and ground unit; you can do that without any or only one camera connected.
2.2. Inside QOpenHD, go to OpenHD -> Air and set V_N_CAMERAS to "DUAL."
2.3. Reboot your air and ground unit.
2.4. Validate by using the dummy camera feature: Reboot the air and ground without any cameras connected; you should now see 2 dummy camera streams and statistics for 2 streams in QOpenHD.
2.5. Power off your air unit and connect your 2 cameras, then reboot. OpenHD should now display your primary and secondary camera feeds coming from your 2 cameras.
⚠️ This documentation is outdated! A current version is available at openhdfpv.org
The easiest way to flash OpenHD images is to use our ImageWriter, just select the Image in the drop down and click flash.
In the advanced tabs there are the images for X86 and Jetson devices.
With 2.3-evo we removed the complex config files. Everything is set up in QOpenhd or the ImageWriter.
OpenHD is setup to automatically setup and connect. On the Air you just get a Command Prompt and no interaction is needed. On the Ground QOpenHD will start automatically and give you a GUI. If not you may have made an error while flashing, please remember selecting GROUND while writing your SDCard.
In general the image writer writes the image, mounts it and writes a file (air.txt) or (ground.txt) into the folder openhd. You just need to do this manually without the ImageWriter. In the future there may be a lot more functionality coming, which then just needs to be done manually.
You need to enable the hotspot in the QOpenHD settings first, it is disabled by default.
With 2.3-evo we extended the camera support a lot, but to do this we needed to add a way to handle all the new cameras. Autodetection isn't that easy anymore. As default all MMAL cameras are selected, but you can select the right Overlay for your camera in AIR_tmp. The overlays are listed in our camera-tabs in this wiki.
Not all cameras are usable, that's why we do not support each and every camera, you can try if it is compatible with one of our overlays, if not it isn't compatible. In general we do not recommend (or actively) support Autofocus cameras, since they are highly susceptible to vibration which can even damage your camera.
⚠️ This documentation is outdated! A current version is available at openhdfpv.org
Having a wide range of options is OpenHD hallmar and since we are focusing on introducing all the changes that a pilot would nedd to make during a flight in the sidebar, we are introducing the new Joystick to allow to make the changes without a touchscreen and without the mess that can be a mouse.
The sidebar as is designed works like a organigramme so you only need "UP" "DOWN" "RIGHT" and "LEFT" to make all the changes ("ENTER" is there just for the future but now it doesnt do anything) You just need 4 buttons that shorts to ground a GPIO pin each time to make a mouvement.
Here is the pinout:
And here is a example of a joystick:
In case you need to change any pin in the ground raspberry pi because of a damage in one pin you need to edit the .txt on the ground sbc named config.txt and scroll down to the bottom until you find "Adding joystick"


⚠️ This documentation is outdated! A current version is available at openhdfpv.org
The following improvements have been made to the provided wiki page:
The latest of OpenHD incorporates a range of advanced features and capabilities:
OpenHD now supports all 2.4GHz and 5.8GHz channels, providing users with versatile frequency options.
OpenHD ensures remarkably stable video reception even in challenging multipath environments. This stability eliminates the constant glitching commonly experienced with analog FPV systems.
The platform offers dual camera support for a variety of , including libcamera, veye, raspivid, USB, thermal, and unmanaged cameras.
OpenHD is developing together with arducam, specifically designed for the platform, expanding hardware choices for our users.
Experience real two-way communication settings, enhancing control and customization options.
The OSD (On-Screen Display) features high-resolution visuals and is fully customizable. It also seamlessly integrates with MAVLink telemetry data.
Users can monitor real-time data such as Received Signal Strength Indicator (RSSI), packet loss, video bitrate, and other critical information directly on the OSD.
OpenHD enables real-time adjustments of various parameters, including TX power, modulation, video settings, camera configurations, and more.
Enjoy the benefits of an adjustable Picture-in-Picture feature for secondary video signals, enhancing situational awareness.
OpenHD employs a unique wifibroadcast link with highly optimized FEC, that overcomes issues commonly associated with standard Wi-Fi connections, such as high latency, disconnections and video freezing. The system ensures rapid video recovery.
OpenHD provides mechanism's to ensure the security of your UAV, including verification and customizable encryption. Always providing a secure link which can not simply be overtaken by external signals.
Bidirectional MAVLink telemetry support is integrated, offering compatibility with a wide range of flight controllers, with remarkable stability.
Users can forward video streams and telemetry data to secondary devices using multiple methods, enhancing data accessibility and allowing for custom setups like FPV over the Internet.
FC (Flight Controller) settings, video parameters, and telemetry configurations seamlessly integrate with QGroundControl without requiring any modifications. For better integration with existing Groundstations.
OpenHD is programmed to work on various platforms, like the raspberry pi or X86 devices. On X86 we provide Images with preinstalled and tuned versions of QOpenHD,OpenHD,Inav,MissionPlanner,QGroundcontrol,...
The OSD overlay displayed on the receiver remains clear and functional even when video quality is compromised, ensuring essential flight information is still accessible.
Configuration tasks are simplified through the use of QOpenHD and the , eliminating the need for complex configuration files.
OpenHD flashing is recommended to be performed using the tool, streamlining the flashing procedure.
Experience low-latency and high-update-rate remote control over the Wi-Fi broadcast link via USB joystick compatibility.
OpenHD employs an optimized Forward Error Correction (FEC) mechanism to ensure the most stable and reliable video transmission connections.
OpenHD benefits from a dedicated and specialized development team that continually strives to enhance the platform. Regular and frequent updates, along with feature improvements, are diligently implemented and tested by this skilled group.
Our will to always innovate, our supporters via and , allow us to test, integrate, manufacture new and exiting hardware. In addition part of our team is working on , which allows us furter optimize and minimize hardware for OpenHD.
The OpenHD Community is a thriving and dynamic hub of support and knowledge. In the event of any challenges or issues, the community is always ready and willing to offer assistance and guidance.
These features are just a collection of most notable features, which enhance the capabilities of OpenHD, making it a powerful and versatile choice for remote video transmission and telemetry in various applications.
⚠️ This documentation is outdated! A current version is available at openhdfpv.org
🔄 This documentation is END OF LIFE and no longer maintainedThe official OpenHD documentation has moved to: 👉 https://openhdfpv.org 👈
Please use the new documentation for:
✅ Up-to-date information
✅ Latest installation guides
✅ Modern troubleshooting
✅ Current hardware support
OpenHD is a suite of software designed for long-range video transmission, telemetry, and RC control. While we originally designed it with hobbyist drones in mind, it can be adapted to a wide range of other applications as well.
Our suite can transmit:
High definition video (with multiple cameras)
Two-way UAV telemetry
Two-way OpenHD telemetry (General settings, range-adjustments, channel-changes, wifi-modulation,...)
All of these signals can be sent over a single transmission channel and telemetry is using MAVlink to ensure high compatibility and stability.
OpenHD employs readily available Wi-Fi adapters, although not in the standard manner commonly associated with everyday Wi-Fi usage. To ensure low-latency and long-distance transmissions, we configure these adapters to function akin to analog video transmission hardware. This innovative protocol, inspired by , has been reimplemented by OpenHD for optimized performance.
The configuration empowers OpenHD to transmit high-quality video and other signals across significant distances while maintaining minimal latency.
We offer a multi-platform with a customizable on-screen display (OSD) for live video. The app is designed to work seamlessly with our suite, and allows you to easily view and control your OpenHD transmission.
If you need help or want to learn more, we offer several resources:
Public and groups for lots of immediate interaction
Please document problems on
⚠️ Important Note: Support for OpenHD 2.0.x is no longer provided.
⚠️ Important Note: If you have a problem with a specific version of OpenHD, please check the name of the image you used to burn your SD cards and provide it to us in Telegram so we can help narrow down the cause and find a solution.
First intro to Open.HD from CurryKitten on


⚠️ This documentation is outdated! A current version is available at openhdfpv.org
Supported Raspberry's for the AirSBC in descending order from good to worse
Earlier Raspberrys might work, but can't be officially supported anymore.
Requires a dt-blob.bin file for your carrier board when used as AIR to support dual cameras at the moment, ask for help in Telegram
Different carrier boards need different dt-blob.bin files, needs to be placed on the root of the SD-Card, if it differs from the ochin board-file
The most widely used and cost/effective
Supported Raspberry's for the GroundSBC in descending order from good to worse
Earlier Raspberrys might work, but can't be officially supported anymore.
Keep in mind, that your carrier board needs to support HDMI and needs (multiple) USB Ports to be used as Ground.
Backup your QOpenHD OSD Settings
⚠️ This documentation is outdated! A current version is available at openhdfpv.org
Re-flashing the OpenHD Image will overwrite all previous Settings. However, you can backup your QOpenHD settings to a file and load this backup file after a re-flash. NOTE: This only includes your QOpenHD specific settings, like color and position of OSD elements. It does not include OpenHD settings, like camera resolution, framerate, bandwidth, channel. 1) Create the backup file: Go to QOpenHD -> Dev -> Save settings to file This will create a file called "QOpenHD.conf" inside your RPI SD Card 2) Save the backup file locally, e.g on a USB drive: 2.1) Power down your ground unit, remove the SD card, and insert it into your PC card reader 2.2) Using windows / linux file explorer, save the file locally to your USB drive. It can be found in the "openhd" folder in the root of your SD card. 3) Use a backup file after a image re-flash: 3.1) Insert ground unit SD card into your PC 3.2) Copy your local backup (e.g. from your USB drive) to the "openhd" folder on your SD card 3.3) Insert your SD card into your ground station (e.g. RPI) 3.3) Go to QOpenHD -> DEV -> Load Settings from file. QOpenHD will prompt you to restart after a successfull load.\
Raspberry Pi Compute Module CM3+
1
Raspberry Pi Compute Module CM4
1,2
Raspberry Pi 4B
Raspberry Pi 3B+
Raspberry Pi 3B
Raspberry Pi 3B mini
Raspberry Pi 3A
Raspberry Pi Compute Module CM3+
1
Raspberry Pi 2B v1.2
Raspberry Pi 3A+
Raspberry Pi Zero 2
3
Raspberry Pi Compute Module CM4
1
Raspberry Pi 4B
Raspberry Pi 3B+
Raspberry Pi 3B
⚠️ This documentation is outdated! A current version is available at openhdfpv.org
Thomas B. Project Lead
Raphael S. Lead Developer
Max P. Lead Hardware Developer
Peter A. Lead Embedded Systems Developer
Since OpenHD is an open source project, it's hard to name every person who contributed to OpenHD over the years, but here we want to add a few honorable mentions (for privacy reasons we'll only mention their nicknames)
⚠️ This documentation is outdated! A current version is available at
The is a carrier board for the Raspberry Pi CM4 module and is meant to expose the connections to the peripherals made available by the CM4 module.
• 4x USB 2.0 480Mbps (4x SM04B-GHS-TB(LF)(SN) connectors)
• 1x USB Type-C (for flashing eMMC)
• 2x CSI camera (2x FH12-22S-0.5SH (55) connectors)

• SPI1 / 6 (SM06B-GHS-TB(LF)(SN) connector)
• UART0 / 1 + Video Out (SM06B-GHS-TB(LF)(SN) connector)
• UART3 / UART5 (SM06B-GHS-TB(LF)(SN) connector)
• USART4 (SM06B-GHS-TB(LF)(SN) connector)
The ochin_CM4 has no video output, it is designed to be used on the “air” side only.
The ochin_CM4 does not have a slot for the microSD, it is therefore mandatory to use Raspberry Pi CM4 modules with eMMC (not lite).
The Raspberry Pi CM4 module get pretty hot very quickly, please use an adequate heatsink.
The ochin_CM4 cannot be powered via the USB-C connector. The Type-C connector is only used for writing the eMMC.
The CSI flat cable is very close to the USBs and it prone to RF noise. It’s suggested to shield the flat cable with copper tape (or at least alu tape);
The USB WiFi dongle will drawn some Amps, please use supply cables of adequate size between the ochin_CM4 board and the USB dongle.
The ochin_CM4 board is equipped with a 5VDC switching regulator, necessary to power the CM4 module and all the peripherals connected to it.
The regulator is able to accept input voltages from 7.5VDC to 28VDC (LiPo from 2S to 7S) and provide output currents up to 7A.
Thanks to the great power supplied by the regulator, it is possible to use the VBUS of the USB ports also to power the WiFi module, which is not normally recommended due to the large currents required by these modules.
However it should be noted that, to protect the CM4 module from any problems on the VBUS, the board is equipped with a current switch, which cuts the VBUS for currents higher than 3A.
This allows you to keep the CM4 module running even in the event of a short on the VBUS.
For this reason it is good to be sure to never exceed 3A on the VBUS (it is rare for a module to reach this limit, in fact 3A at 5V are 15W of power drawn).
However, it is possible to bypass the current switch in case you need more current on the VBUS, waiving the VBUS safety (see the ochin_CM4 board manual).
The CM4 connectors are quite delicate and very dense, so you need to be careful.
Before positioning the CM4 module, it is advisable to check that there are no specks of dust or other things that could prevent contact of the pins, if necessary clean with a brush and air.
Place the module gently on the connectors until you feel they are seated in each other (there is a first zero force step where they snap into). When you are sure that the two boards are perfectly aligned and the connectors engaged, press the two long edges of the CM4 module until the connectors are fully inserted.
It is advisable to limit the disassembly of the CM4 module as much as possible to avoid damaging the connector contacts.
To remove the CM4 module from the ochin board is always suggested to use the proper extractor.
You can find the .STL files to print here.
The procedure to flash the CM4 eMMC it’s straightforward, what you need to do in synthesis is the following:
Power up the board with boot configuration as “mass storage device”. • To do so you need to power off the board (no Vin connected) • Press the “nRPiboot” button and, keeping it pressed power up the board using the “Vin” Connector. • Connect the board to your PC using the USB Type-C port
Run the “RPiboot” software, downloaded from the Raspberry Pi website. After the software starts, the PC will see the partition of the eMMC like if it would an SD into the SDcard reader.
Flash the eMMC using the OpenHD imageWriter.
OpenHd already includes the dt-blob.bin file, and 'dtoverlay=dwc2,dr_mode=host' has been enabled in 'boot/config.txt'.
The CSI camera can be connected to one of the two FFC connectors.
If you want to use the "Camera0" connector, make sure that the two jumpers of the I2C (used for the camera config) are shorted.
The WiFi dongle can be connected to one of the 4 USB connectors on the board.
In order to minimize the problems associated with connecting a "fast bus" such as USB, it is advisable to cut a USB extender and solder it to a GHS connector, leaving the wires on the connector side as short as possible.
To connect the telemetry to the FC it is possible to use one of the available UART ports, the UART used by default is UART0 / 1.
It is important to keep in mind that the GPIOs of the CM4 module are not 5V tolerant, it is therefore important to be sure that the logic levels of the FC UART are 0V-3V3.
⚠️ This documentation is outdated! A current version is available at
Starting with the evo releases OpenHD managed the step to be less platform independend, which means that we not only support the RaspberryPi, but can be used on multiple platforms.
Currently OpenHD supports : X86,RPI,Rock5 and our Custom Hardware.
Our will allow the low latency features so many users requested, while also giving superb image quality and size.
Lowest latency can be achieved with OpenHD-Custom Hardware. Because of carefully selected SBC and Camera and a little "magic", which can't be reproduced on "normal" SBC's. This has the ability to cut the latency in half.
⚠️ This documentation is outdated! A current version is available at
Note: This guide is a work in progress and requires a deep understanding of Linux systems and manual debugging.
Running OpenHD and QOpenHD on hardware that is not officially supported requires careful consideration of hardware specifications, Linux kernel behavior, and manual debugging. This guide outlines the essential requirements and steps to achieve this.
Before attempting to run OpenHD on unsupported hardware, make sure your device meets the following criteria:
Second lowest latency can be archieved with Rock5, which can hardware encode in realtime h265.
For receiving lowest latency, currently the Rock5 or a X86 System with great performance is needed.
Single Board Computers are little computer's like the Raspberry Pi, which are build to run computing tasks efficiently and without additional components. For the sake of simplicity we also include X86-Computers to that definition, even if they aren't sbc's at all.
Camera Support: Your hardware should have a mipi-csi connector for connecting low-latency cameras, parallel MIPI or other alternatives are not usable. (ov5647 is not a usable camera for outdoors)
NEON HW-Acceleration: Ensure your hardware supports NEON HW-acceleration for OpenHD forward error correction, without it you won't have video at all.
Hardware Encoder: The device must feature a hardware encoder capable of supporting h.264 and optionally h.265 formats at a minimum of 720/60fps.
USB Port: A USB port is required for interfacing with the Wifi Card.
Minimum RAM: Your hardware should possess at least 512MB of RAM. Lower configurations can work but may complicate the process.
Modern Linux Kernel: Make sure your hardware runs on a modern Linux kernel version 5.0 or higher for optimal compatibility.
Gstreamer Encode Pipeline: Find or create a low-latency Gstreamer encode pipeline that is hardware-accelerated for efficient video encoding.
To enable camera support for OpenHD on unsupported hardware, follow these steps:
Verify if your Single Board Computer (SBC) has a mipi-csi connector compatible with low-latency cameras. (ov5647 is not a usable camera for outdoors)
Create a Kernel Overlay (dto/dtbo/dts) that adds camera support to your kernel. This overlay will need to be used during kernel compilation.
Look for official sensor support listed by the SBC vendor. These sensors can usually be used in OpenHD.
All cameras without inbuild ISP require a tuning file with special parameters. Ensure you have the necessary tuning file for your camera, SOC and ISP, it needs to be specifically tuned to your configuation. If there is no tuning fila available, you are out of luck, there are some companies which create these tuning files, but their services start at 10000USD and go way up with complexity and low order-numbers.
For OpenHD on the ground, consider the following steps:
Decoder Support: Make sure your SBC has a capable h.264/h.265 decoder and proper documentation.
Gstreamer Decode Pipeline: Create a low-latency Gstreamer decode pipeline. Hardware acceleration should be a priority for optimal performance.
Compositor Configuration: Understand how the compositor on your SBC works, particularly if it supports multiple layers for smooth video playback behind other elements, for this you either need a custom decoder, which is capable to write directly into the compositor without checking for KMS-Master's or you need a compositor which allows multiple kms master.
When dealing with WiFi drivers, consider these options:
For 8812au or 8812bu chipsets, installation can be relatively straightforward.
compile the drivers using DKMS or make from the provided repositories:
To compile OpenHD from source, follow these steps:
Clone the OpenHD repository (including submodules).
Determine and install required dependencies. The install_build_dep file can be helpful for this.
Install a modern version of CMake.
Execute the build_cmake.sh script.
This should set up the base environment, and you can modify OpenHD with your specific pipelines.
For compiling QOpenHD, the user needs to be aware of the following:
Use QT version 5.15.x or higher.
Employ EGLFS for SBCs to maximize hardware utilization.
Ensure support for multiple hardware layers to prevent high latency and software decoding.
Study the decode-services and integrate custom ones as needed.
For compiling QOpenHD, follow these steps:
Ensure the Linux system has a QT 5.15.x. installation
Compile mavsdk with the necessary modifications.
Compile QOpenHD using the build_qmake.sh script.
To identify KMS-planes for hardware decoding, follow these steps:
Install the libdrm-tests package.
Use modetest -p to check for available planes for kmssink.
Logging is via standard Linux journalling
Open a second terminal and type journalctl -f for "live" logs
Running OpenHD and QOpenHD on unsupported hardware requires a deep understanding of hardware capabilities, Linux kernel features, and the intricacies of video processing. By following the steps outlined in this guide, you can work towards achieving successful implementation on your chosen hardware. Keep in mind that the process may involve trial and error, as well as manual debugging to overcome potential challenges. Also keep in mind, that the developers can not help you with every step, if you are not capable of doing it without much help, please use the supported platforms.
⚠️ This documentation is outdated! A current version is available at openhdfpv.org
When a project reaches a certain stage, the amount of options to choose from can get pretty overwhelming. This section of the documentation is intended to help guide newcomers to the project towards their first functional OpenHD implementation.
If you have a pre-existing hardware requirement that is not met in this guide, it is still a good idea to follow the guide and make sure you have this, the simplest setup, working before venturing into the more complex setups. Every setup, no matter how complex uses the elements in this guide at it's base.
Assuming you are starting with nothing, we recommend you get the following Hardware:
A regular Laptop with disabled SecureBoot
A 8812AU, 8812BU, 8811AU or 8814AU WiFi Card (See )
A fast USB stick, to write the OpenHD USB Image on
A Raspberry Pi Zero 2:
High Quality BEC's, one for the Wifi-Adapter and one for the Raspberry. (See Wiring -> Power)
A () and the required cable (keep in mind, the Pi Zero uses a 22 Pin type B csi cable)
A Raspberry CM4 with EMMC with:
An board
We recommend fitting a cooler to the CM4, because it really can get hot.
Now that you have your prerequisite Hardware, we can get down to business.
When using X86 the genaral rule of thumb is "the more potent"/newer the device is, the lower the latency should be. Keep in mind, that you have enough battery or an external charging device. Its also recommended to use a device with a good screen (high brightness) to have a pleasent experience
Since we use very powerfull WiFi-Cards and most SBC's have limited USB-Output-Power, we need a dedicated BEC for that Card's. In Addition to that it's mandatory to solder the wifi card to the SBC because on the Air-SBC vibrations and movement in general will result in connection problems, that's why we recommend to remove the USB-Connector or at least solder to the USB-Connector. If you need help with that look in our forums, there are some extensive guides how to do it nicely. Also writing in the Telegram or Discord Chat can help you. Is recommended to visit the wiring section to see how to connect everything ()
Please refer to the () since its quite similar
Please make sure SecureBoot is disabled and set up your BIOS(UEFI) to boot from USB. Everything else is beeing taken care of. If QOpenHD doesn't start automatically, please execute OpenHD and QOpenHD which are linked to your Desktop.
(The boot can take several minutes, depending on your usb-sticks speed)
If you're not using the Ochin board,you can jump to the next step. If you're using the Ochin, you first need to install your CM4 into the Ochin board and flash it. The Ochin board requires external power even when the usb-c is connected. To enter the "flash-mode" push the Button while connecting power. Now you can continue with the normal setup shown in this Video. And when it comes to flashing jump to the next Step
Keep in mind, flashing is very slow, because some limitations of the RPi-Foundation. Do not disconnect while flashing, it can brick your device.
Please refer to the ()
The first boot will take several minutes, because initial configs and setups are executed. The SBC will reboot multiple times. OpenHD will automatically start to transmit Video, if everything is correct.
To know if you at least have connection you can go to the tab "status" and if you can see both air and ground "live" both are connected and we can move on
If you haven't configured your camera correctly you'll see a black image that says "rebooting camera", in this case look into the "AIR CAM 1" Menu in QOpenHD (the OpenHD Logo opens the Menu) and select the correct camera overlay in the CAMERA_TYPE setting. After this your SBC will reboot and start transmitting video.
If you dont have telemetry coming from your FC to the ground usually its an issue of wiring (refer to () to know how to connect the FC to the air, if not fixed it can be and issue with the baud rate of the uart (remember that needs to be the same) you can change it on OpenHD or on your FC, to change it on OpenHD you need to go to the "AIR" tab and then into the "FC_UART_BAUD"
()
OpenHD has a enormous amount of settings but the most important ones are going to be explained here below
The first thing that almost everyone needs to set up its the power of the cards, the frecuency and STBC and LDPC, you can do all of it in a single tab located in "OPENHD" and "LINK/QUICK" Also you have the options "SCAN" and "ANALYZE" the first one its very handy to find the frequency where your UAV is transmittings and the second one analyze all the wifi spectrum to find how pulluted are the wifi frequencies (it takes a while)
To change the power please refer to the () STBC and LDPC are two important parameters that needs to be turn on on both air and ground to improve wifi coverage and range by using the two antennas to receive and send at the same time, by default both are off because you CANT turn them on in rtl8811au because it only has one antenna
Now we need to introduce is the "SIDEBAR" that opens in the side of your main screen to allow you to change important settings without lossing eye contact with the video To open it just click on the red circle
In this sidebar you can finish your configuration and also change settings while flying, you can move around it with the touch or with a mouse In this firts tab called "LINK" you can select your wifi frequency (you cant change it while armed), channel width and bandwith
In this tab called "VIDEO" you can select your resolution for the link and also rotate the camera if you wish (the resolution that you set here is also the resolution that is going to be recorded)
In the thrid tab called "CAMERA" you can change settings of the camera itself like saturation, contrast, sharpness and brightness
In the fourth tab called "AIR RECORDING" you can change settings regarding the air recording, in EVO we use air recording instead of ground recording like in 2.0 to improve the experience of the recording by removing the possible interference that can be present in the link By deafult is set to OFF but you can set it up ON or AUTO, in AUTO the system is going to start recording at the moment you arm the UAV
Other very important screen is the one where you can see statistics of the link, to open it click on the red circle
⚠️ This documentation is outdated! A current version is available at openhdfpv.org
Donations are handled through OpenCollective, a non-profit 501(c)(6) funding host.
You can make a single or monthly donation of any amount.
100% of donations are used for hardware purchases to ensure team members have access to the SBCs, cameras and radios they need to help work on the project.
The OpenHD project uses Github to manage its source code. The code is split into multiple repositories which itself have multiple branches. Github is also used to build all packages and images. Packages are hosted on Cloudsmith, which hosts and distributes packages for OpenHD.
If you're interested in contributing to OpenHD, the easiest way is to join our . The core-development group is also doing weekly meetings on Discord. Those are not open for everyone, but occasionally we invite guests. If you are interested in cooperating with OpenHD, just write us a message at: development@openhdfpv.org and we'll schedule a meeting.
There are several repositories for different parts of the OpenHD system. The most important ones are:
, the main software which handles all the features that are needed to run the OpenHD project.
, the GUI/Configuator app which displays the video and OSD, but is also the UI for OpenHD.
, the repository containing the script which builds all our images.
The most stable code is hosted in #master. New branches are made for major and minor releases. These are either a development snapshot for older versions like #2.0 or contain actively developed non-stable code like #2.2.3-evo, which isn't ready to be pushed into #master yet. The lead developers usually use branches like "consti-test", "rapha-test",... to develop new features and fix bugs. Those branches are highly unstable, aren't ready for non-dev usage and can change rapidly.
This is not intended to be a full guide to using Github.
To start start developing/fixing bugs, you should fork the repository on Github first before making any changes or cloning anything to your local machine, and then clone your fork rather than the main OpenHD/Open.HD repository.
Make a new branch
Before you start making any changes to the files, you should now create a new branch specifically for your changes.
If you are working on a fix for a bug affecting the airspeed display, you might create a branch called fix_airspeed. You should always keep unrelated changes in different branches so they can be tested separately and submitted to the main repository as individual pull requests on Github.
Now make your changes to the files in the repository.
Comment and Document your changes
When programming changes, please comment as much as possible. Our current goal is to have a highly docomented/commented code in order to make mods and changes easier in the future.
Opening a pull request
To finally merge your code into OpenHD you need to open a pull request.
In your pull request, make sure you describe what you changed, why it was needed and the result of any testing you've done with those changes. If you need help building a new image that can be tested, ask in the .
⚠️ This documentation is outdated! A current version is available at
X86 is a quite common Architecture. Most of modern Computers do run X86 processors, which often are much more powerfull then any SBC.
With 2.3-evo we start to support X86 in two ways.
We provide Images which are already setup and can be used via plugging an external USB-Drive/USB-Stick into your computer and run it live.
OpenHD/OpenHD_KernelBuilder, the repository containing the script which builds all our kernels.
We provide X86 packages for Ubuntu 22.04. If you want you can build your own OpenHD Image/Setup right on your computer.
X86 will have different performance gains or losses depending on the Hardware used. The OpenHD Developers use quite potent Gaming-Hardware to test, so your experience will vary.
OpenHD will also interfere with your normal wifi-setup, it requires special drivers and may cause problems on your own installs.Thats why support always will be limited.
You can simply use our ImageWriter to flash OpenHD images to a USB-Stick. The Images can be found under the Advanced tab. (you do not need to setup ground or air, because it'll be selectable on the Desktop of the Image)
Please keep in mind, that your USB-Stick should be quite fast to reduce boot time.
When booted you'll be greeted by a Desktop which includes the Programs you need to run OpenHD. (You need to run OpenHD-Ground and QOpenHD for Ground usage)
Installing:
We added OpenHD as Standard Linux Application, so you can find it under Applications. Please select OpenHD-Air or OpenHD-Ground depending on your usecase. When running OpenHD as Ground, you also need to start QOpenHD to view the user interface.
** Wifi Adapter not found **
One cause could be that the drivers could not be installed because you are using secure boot
** Wifi Adapter (e.g. Asus AC56) does not show the indicator LED**
The new drivers don't support intercation with the LED anymore, so this is not a problem
Currently we only support Ubuntu 22.04 based Distributions.
sudo apt update && sudo apt upgrade -y && sudo apt install -y git && sudo git clone https://github.com/OpenHD/OpenHD-ImageBuilder && cd OpenHD-ImageBuilder && sudo ./X86-Installer.sh Various lengths of connection wires.
A 8812AU, 8812BU, 8811AU or 8814AU WiFi Card (See WiFi Adapters)
A (supported Camera) and the required cable (keep in mind, the Ochin uses a 22 Pin type B csi cable)
A soldering iron and required disposables for creating the connections to the Wifi-Card
Pi Zero 1 is not supported you need the version 2 !
The flasing process can be much longer than on RPI
If you have any issues now, please don't hesitate and write in our Chats, so we can help you get everything working correctly.


⚠️ This documentation is outdated! A current version is available at openhdfpv.org
Mission Planner (MP) is a Ground Control Station (GCS) software for all types of vehicles based upon the ArduPilot open source autopilot system, e.g. ArduPlane, ArduCopter, ArduRover or newest to the family ArduSub. It is compatible with Windows only. It can be used as a configuration utility or as a dynamic control supplement for your autonomous vehicle. Here are just a few things you can do with MP:
Flash firmware (the software) into the autopilot board (i.e. Pixhawk series) that controls your vehicle.
Setup, configure, and tune your vehicle for optimum performance.
Plan, save and load autonomous missions into the autopilot with simple point-and-click way-point entry on Google or other maps.
Download and analyze mission logs created by the autopilot.
Interface with a PC flight simulator to create a full hardware-in-the-loop UAV simulator.
Monitor your vehicle’s status while in operation.
Record telemetry logs which contain much more information than the on-board autopilot logs.
View and analyze the telemetry logs.
Operate your vehicle in FPV (first person view)
The first thing apart of obviusly download Mission planner you need to download a third-party software named Gstreamer .
In order to use MP in conjunction with OpenHD it is necessary to forward all telemetry to the PC, you can do it over WIFI or over Ethernet. We recommend to use ETHERNET over WIFI because the hostpot wifi on the RPI is very very noisy and can interfere with the main link between air and ground. All of the following settings are common to WIFI and ETHERNET.
⚠️ Important Note: Here´s what can happen if you use wifi as a connection method for external telemetry during flight.
Now, Let's gets get started:
The Wifi hostpot is by default ON when disarm and OFF when arm because the possible interference, you can change it using the sidebar, if you want to use Ethernet just connect the cable
Next power on your Air- and GroundPi
Enter in the Ground tab and here change the settings "Ethernet" from disable to Hostpot or forward+internet, the last one is very handy to give internet to the pc from your phone
Reboot ground unit, once you have done this settings you can leave it ON it doesnt interfere with anything
Open Mission Planner and select as method of connection TCP
Once selected a few windows will pop up, in the first one you should enter the IP (192.168.3.1)
In the next window you have to introduce the port (5760)
Now you should have video but not telemetry, to solve it you need to press in the drop-down and change it from "onboard" to "Fixed wing"
Everything should be ready and working


⚠️ This documentation is outdated! A current version is available at openhdfpv.org
⚠️ Important Note: OpenHD does not support ANY autofocus cameras due to their impracticality on equipment with vibrations, such as drones. This restriction includes the official Raspberry Pi V3 lineup.
On the Raspberry Pi, you have the option to choose between two CSI camera modes.
The Broadcom MMAL mode is the legacy camera stack. It only works with original Raspberry Pi Foundation cameras or clones that have the security chip. While it offers better latency compared to libcamera, it has been deprecated by the Raspberry Pi Foundation in favor of libcamera. OpenHD uses Broadcom MMAL as the default option, as done in previous OpenHD releases.
The libcamera mode works with both original Raspberry Pi Foundation cameras and a wide range of other cameras. Generally, you can achieve the same or even better image quality using libcamera by selecting the appropriate CSI camera. However, it might not provide the same latency as broadcom mmal.
You can switch between Cameras using QOpenHD (V_OS_CAM_CONFIG), but it requires a reboot.
Note: Autodetection is not available for identifying whether you've connected a camera supported only by libcamera/libcamera-ardu. You must manually select the appropriate CSI camera mode in QOpenHD for OpenHD to detect your CSI camera.
Note: We use a proprietary version of the libcamera library, which ensures compatibility with arducam and normal libcamera while also providing image adjustments which are normally excluded in gstreamer-libcamera. This version is licenced to OpenHD and not Open Source.
Tip: When choosing between the camera modes, consider your latency and image quality requirements along with the compatibility of the camera you are using.

⚠️ This documentation is outdated! A current version is available at openhdfpv.org
The Radxa Single Board Computers (SBCs) are highly capable devices that offer significantly higher performance compared to the Raspberry Pi. Due to their impressive capabilities, we have incorporated support for Radxa SBCs in our 2.4-Evo releases and newer.
However, it's important to note that the software development for Radxa SBCs is currently in its early stages. We recommend using them primarily on the ground where hardware decoding support is only partially functional. Despite this limitation, the performance is still superior to that of the Raspberry Pi.
At present, there is only one camera available for Radxa SBCs, namely the IMX415, which may not meet the requirements of OpenHD. To address this limitation, we are actively collaborating with Arducam to develop and offer better camera options for Radxa SBCs.
For it there is a initial pipeline included, but it may not function well. We're also working on a HDMI pipeline and the integration for this. But keep in mind that only the Rock5B does have this functionality.
In the near future, we have plans to introduce support for the newest camera module from Arducam, the IMX462.
The following Radxa SBC models are currently supported:
The following Radxa SBC models are currently being worked on:
*not technically radxa but we run radxa software on that board, it's also not the best working board, so it may take a lot of time until it is perfectly supported
Even 7 keys mapped to GPIO pins, only Right/Left/Up/Down needed for joystick navigation.
⚠️ This documentation is outdated! A current version is available at openhdfpv.org
The RPI HDMI to CSI adapter provides a means of interfacing HDMI output from cameras to the Raspberry Pi platform. However, it's important to note that this adapter is not officially supported by the Raspberry Pi Foundation, and as a result, it presents certain challenges and limitations. Here's a concise rundown of these quirks:
Encoder Bitrate Control: One notable issue is the unreliable performance of the encoder bitrate control. This often results in fluctuations like overshoot and undershoot in the bit rate. To mitigate this problem, it is recommended to disable variable bitrate and instead manually set a conservative bitrate, such as 8 MBit/s for MCS3 encoding.
Resolution and Framerate Configuration: Configuring the resolution and framerate through the adapter can be problematic and may even fail in certain instances. To enhance the likelihood of successful configuration, it is advised to set the camera resolution to match exactly the resolution and framerate output by your HDMI source.
Maximum Resolution and Framerate: The Raspberry Pi hardware encoder is constrained to a maximum output of 1080p@30fps or 720p@60fps. Consequently, it's important not to select an HDMI output video signal from your camera that exceeds these limits.
Reliable Adapter Detection: For consistent and reliable detection of the HDMI to CSI adapter during boot, it is crucial to sequence the power supply. In practice, ensure that the OpenHD system is powered on after your HDMI camera. This ensures that the adapter receives a valid HDMI input signal prior to the initialization of the Air Pi system.
While the RPI HDMI to CSI adapter serves as a bridge between HDMI cameras and Raspberry Pi devices, its unofficial nature can lead to these operational quirks. Users seeking to employ this adapter should be aware of these limitations and implement the recommended workarounds for optimal results.
5V INPUT
5
6
GNS
7
8
9
10
11
12
13
14
15
16
17
18
19
20
21
22
Del key
Backspace key
23
24
25
26
27
28
29
30
31
32
33
34
Right key
35
36
Enter key
Left key
37
38
Down key
39
40
Up key
Radxa Rock5B
Radxa Rock5A
Radxa CM3
Core3566*
Radxa Zero3W
1
2
3
4

⚠️ This documentation is outdated! A current version is available at openhdfpv.org
⚠️ Important Note: IP camera support has limitations and should be chosen carefully, considering its disadvantages.
IP cameras cannot be automatically detected, as they lack a common protocol like USB cameras. They also require custom scripting for integration and lack support for bitrate adjustments, making them quite bad for long range sytems. They also don't support adjusting the keyframe interval, which can black out your video for several seconds when having any interference.
To implement IP cameras, you can utilize the custom_unmanaged_camera.sh script, which needs to be activated through the configuration.
For advanced users, we have implemented "scripting support," which allows for custom camera pipelines, IP cameras, and general debugging.
Currently, there are several example pipelines available for:
This feature requires disabling auto-detection and needs manual activation in the hardware.conf configuration file.
Step 1 Before setting things in OpenHD, first configure the following things in the IP camera:
Setup static IP for the camera. Configure a H.264 rtsp stream and test it in a program like VLC.
After that, you are ready to start with OpenHD configuration.
Step 2
To configure the camera, you need to configure a script that starts the network connection to the camera and then starts the Gtreamer pipeline. Over this you also need to create a service that executes this script when the air sbc is turned on.
To configure the pipeline to the camera you need to modify the script “custom_unmanaged_camera_old.sh” in air sbc. Rename it to “custom_unmanaged_camera.sh”. After that, open the script and you will find different examples of configuration for connection to different cameras. Copy “setup_and_stream_ip_cam_siyi_h264” configuration and rename it to a different name. Now to configure “LOCALIP” and “GATEWAYIP” with the same first 3 numbers as your IP camera IP and with the last number being different in all 3 cases. Then you need to change the stream link in the Gstreamer pipeline command with the correct one of your camera. The configuration should look like this:
Step 3
At the bottom of the script, comment all the configurations and put the name of the new one you have created and save the file. Finally, open a terminal and execute the following command “sudo chmod +x PATH/custom_unmanaged_camera.sh” with the correct path to the file.
Step 4
To create the service that activates the script you must follow the next steps. Download the following file (https://github.com/OpenHD/OpenHD/blob/2.5-evo-rapha/systemd/custom_unmanaged_camera.service) that isn't included in version 2.6.0 of OpenHD. You need to copy that file in /boot/etc/systemd/system/ but you need to do it using the terminal with the command “sudo cp ORIGINPATH/custom_unmanaged_camera.service DESTINATIONPATH/etc/systemd/system/” where both “originpath” and “destinationpath” are correct paths. After that you are ready to turn on air sbc and follow next steps. Connect a monitor and a keyboard to air sbc and exit from kiosk mode using Ctrl+C. After that, activate the new service using “sudo systemctl enable custom_unmanaged_camera” command. Following that, start the service with “sudo systemctl start custom_unmanaged_camera” command and then confirm that it is active with “sudo systemctl status custom_unmanaged_camera” command. Reboot air sbc with “sudo reboot” and it should be ready.
Step 5
To configure the visualization in QOpenHD go to the menu and setup the camera as DEV=>External.
Note 1: The custom unmanaged camera service requires careful testing and doesn't provide automatic functionality right away. It is intended for advanced users and developers who understand its intricacies.
We encourage you to experiment with this feature, but please be aware that it's meant for users with a good understanding of camera pipelines and system integration.
IP-Cameras are not specifically designed for low latency, and many of them have latency upwards of 500ms+, but there are specific cameras available for purchase that have reasonable latency closer to 100-200ms. Remember this latency will be added to the "normal" latency your system has. So most IP-Camera Setups will have 300-600ms latency. It is not recommended to use an IP-Camera as primary camera. That means the main reason to choose an IP-Camera is to enable some custom features normal Cameras do not support.
OpenIPC cameras
General IP cameras
Seek Thermal cameras

⚠️ This documentation is outdated! A current version is available at openhdfpv.org
As the Rock5 is a distinct platform and MIPI is not a plug-and-play system, we are awaiting official camera releases for compatibility. We are actively dedicating resources to introduce more camera options in the future.
Currently, the camera support is limited to:
Note 1: There currently appears to be no compatible adapter or camera with this sensor available for the Rock5.
We are working towards expanding the selection of supported cameras and adapters, and we appreciate your patience as we continue to develop and improve camera compatibility
1
IMX219
1
IMX415*
*
Arducam IMX462 B0333
*
1
Arducam IMX708 B0310
*


⚠️ This documentation is outdated! A current version is available at openhdfpv.org
OpenHD supports a variety of thermal cameras, including the Hti-301, Infiray T2, and others.
Thermal cameras typically connect via USB and need to be enabled as secondary cameras.
Thermal cameras are not like ordinary cameras. It's important to review available information about each camera before making any purchase decisions.
Surprisingly, a thermal camera with a resolution of 204x156 can be notably worse than one with an 80x60 resolution. The entire thermal imaging system matters, from lens material and size to the sensor type, sensor resolution, and image post-processing by the camera.
Any weak link in the system can severely degrade the image, making it unsuitable for specific uses. Sometimes, this trade-off is acceptable to achieve a lower price point.
Additionally, remember that while a thermal camera might be useful for close-up electronics work or basic household tasks, it may not perform well for drone flight.
Thermal cameras are highly regulated items, so legal requirements can impact purchasing decisions. Depending on your location, you may need to pay a higher price, obtain licenses, or face limitations on buying certain cameras.
Regulations often center around frame rate, not resolution. This is due to the potential use of thermal cameras in weapons.
For countries part of the Wassenaar agreement, buying 30/60Hz thermal cameras is possible, although prices may be higher if imported from the United States.
Direct purchase options are available from Chinese companies like Hti Instrument on platforms like AliExpress and TaoBao. If obtaining FLIR or Seek cameras from the U.S. proves difficult, alternatives like Hti might be more accessible.
Consider what you will realistically see with a specific thermal camera in various situations.
Low-resolution thermal cameras might show a hot object in an area but not identify it. While this could work for search and rescue, situations requiring higher thermal resolution might necessitate better cameras.
Remember that thermal cameras have much lower resolutions compared to typical FPV cameras. For instance, a 1280x720 FPV camera has 48x the resolution of a 160x120 thermal camera. At greater distances, the main FPV camera might be able to see an object while the thermal camera cannot.
Also, consider the thermal "span" of the area in view. If everything has nearly the same temperature, the image could be noisy or flat. In such cases, a low NETD rating and a larger lens are necessary.
Here are brief descriptions of individual cameras mentioned earlier. Carefully read this information before purchasing any of them.
A high-quality thermal camera with 384x288 resolution, a large germanium lens, and a 25Hz frame rate. Though more expensive, its thermal performance is excellent. These cameras work as regular webcams, requiring no special driver.
A 320x256 thermal imager core with a 60Hz frame rate. Expensive but equipped with Germanium lenses. Primarily designed for integration in larger camera systems or drones. Requires an appropriate connection board. Export controlled due to the high frame rate.
The lens on a thermal camera isn't ordinary glass (which doesn't allow IR wavelengths to pass through).
Germanium lenses offer high-quality thermal images but are costly. Many lightweight thermal cameras use Silicon or Chalcogenide lenses instead.
In most cases, you can't replace a thermal camera lens unless it's designed for it. Even cameras with removable lenses often require careful handling to avoid damage.
⚠️ This documentation is outdated! A current version is available at openhdfpv.org
As part of the larger OpenHD ecosystem, the OpenHD custom hardware project aims to develop a specialized camera designed to work seamlessly with the OpenHD Custom Hardware project.
The custom cameras will be optimized for use in drone racing and aerial videography applications, offering high-quality imaging capabilities and low latency transmission. They will be designed to integrate seamlessly with the OpenHD Custom Hardware system, providing a complete end-to-end solution for drone enthusiasts.
The OpenHD custom hardware project is currently in development, and prototypes are being tested and refined to ensure optimal performance and reliability. As the project progresses, the team will be working to create a final version of the cameras that meets the needs of drone racing and aerial videography enthusiasts.
If you would like to learn more about this project and stay up-to-date on its progress, be sure to visit . The team is always looking for new supporters and contributors to help bring this exciting project to life.
WiFi Adapters for OpenHD Evo
⚠️ This documentation is outdated! A current version is available at openhdfpv.org
If you are new to OpenHD and not familiar with all the advantages and disadvantages of different WiFi cards, consider getting 2x ASUS USB-AC56 or a similar high-quality adapter using the RTL8812AU chipset. Pay close attention to the version number of the WiFi adapter, as manufacturers often use different chipsets with varying version numbers. Each letter and number in the version matters; they are not the same.
When choosing between 2.4GHz and 5.8GHz, keep in mind that while 2.4GHz offers better penetration, it is more susceptible to common sources of interference, and finding a clean channel on 2.4GHz can be challenging. 5.8GHz also allows you to use your existing 2.4GHz RC transmitters. For these reasons, many users currently prefer 5.8GHz for OpenHD.
You can achieve RX diversity by using either a WiFi card with multiple antennas or multiple WiFi cards on your ground station. However, it's easy to make mistakes with improper wiring or using the wrong antennas when using more than one RX card. Therefore, we do not recommend using more than one card for new users. Mixing cards with different chipsets or from different vendors, even if they support the same frequency, is also not recommended.
RTL8812AU, RTL8814AU, RTL8811AU
RTL8812BU
RTL8812EU
*We recommend using this chipset in 5.8GHz mode.
Please note that this list includes tested devices, but there are many more supported devices.
Since with OpenHD 2.5 we started to utilize the Link a lot more efficient and allow settings like 40mhz and default to normal FPV/DJI/HDZERO/Walksnail.... frequencies, which doesn't work at all with Atheros chipsets, so we decided to drop support for them.
This chip is the most recent wifi chip available and one of the most potent ones, it has one of the best cost/performance relations.
⚠️ Important Note: This wifi chip/module doesnt have FCC and CE certification to use or buy in EU so if you do that its within your own responsability .
The ASUS AC56 adapter is currently the most popular choice for OpenHD. Its small size makes it easy to fit into many builds, it uses 5.8GHz, and it is widely available. While the retail price can be high, it is often available used or on sale for $30 or less. It has one internal antenna, and the second antenna is optional, connecting with RP-SMA.
The Taobao Card is a generic RTL8812AU card sold on Taobao, from which it gets its name. It is widely used and known to work well, but it tends to get hot. The reported power output is 500mW. This card requires soldered wiring, or the USB connection may disconnect before or even during flight. It supports 2x u.fl antenna connectors.
For affordable alternatives, check out computer stores and consider Aliexpress. Exercise caution, as some cards may have questionable quality. Generally, high-quality or brand-name modules with RTL8812AU chipsets perform best.
To discover more about WiFi sticks and modules offered online, look for product numbers, chipsets, or FCC IDs. Search for high-resolution internal photos of the cards to identify the chipset and amplifiers used. You can also use helpful websites like:
(FCC documents with internal photos)
(General information and sometimes photos)
When you find photos, search for the amplifier numbers to find datasheets that provide rough estimates of the expected output power.
Please consider reporting your findings if you've tried a WiFi card that is not listed here.
⚠️ This documentation is outdated! A current version is available at
OpenHD supports a range of flight controllers through MavLink integration, with a general recommendation of F405 or better controllers for optimal performance. The following flight controller software is currently supported:
⚠️ This documentation is outdated! A current version is available at openhdfpv.org
Betaflight support is currently in development.
Warning: Betaflight support is currently not enabled, and the development team is actively working on enabling it. It's important to be aware that Betaflight doesn't allow for bidirectional MavLink, meaning that settings cannot be changed via MavLink, and OpenHD-RC functionality is not available.
5.8
+800mW
RTL8812EU
2x u.fl
ASUS USB-AC56
5.8 - 2.4*
500mW
RTL8812AU
1x RP-SMA 1x MS156
"Taobao Card"
5.8 - 2.4*
500mW
RTL8812AU
2x u.fl
ALFA AWUS1900
5.8 - 2.4*
500mW
RTL8814AU
4x RP-SMA
Tenda U12
5.8 - 2.4*
60mW
RTL8812AU
2x MS156 2x internal
Cudy AC 1300
5.8
<50mW
RTL8812BU
internal
Aigital AC1200
5.8
? low power
RTL8812BU
internal
COMFAST 1300Mbps
5.8
? low power
RTL8812BU
internal
D-Link DWA-182
5.8 - 2.4*
70mW
RTL8812BU
2x internal
TP-LINK T3U Plus
5.8 - 2.4*
40mW
RTL8812BU
2x u.fl 1x RP-SMA
TP-Link T3U
5.8 - 2.4*
80mW
RTL8812BU
2x MS156 2x internal
ALFA AWUS036ACH
5.8 - 2.4*
500mW
RTL8812AU
2x RP-SMA
Netgear A6100
5.8 - 2.4*
50mW
RTL8811AU
1x internal


BLM8812EU
Yes
Yes
Yes
No
Warning: Betaflight support is sometimes not great, we recommend using Inav or Ardupilot, Betaflight also doesn't allow for bidirectional MavLink, meaning that settings cannot be changed via MavLink, and OpenHD-RC functionality is not available.
For the best experience with OpenHD, flight controllers with an F405 or better chipset are recommended due to their processing power and compatibility with OpenHD features. These controllers are well-suited to provide a seamless integration between OpenHD and your aircraft.
*this is not complete, just shows FC's that are commonly used.
When selecting a flight controller, consider the specific requirements of your drone and the software you plan to use. In general Inav is recommended for beginners and Arduplane is more tailored to experienced users due to its complexity during setup.
Make sure the chosen flight controller has enough UART ports for your setup. A common setup includes:
UART1 for the control link (ELRS, Frsky, etc.)
UART2 for GPS
UART3 for OpenHD
If you plan to incorporate additional components such as a gimbal, secondary GPS, or advanced sensors, you'll need more UART ports.
Not all flight controllers are compatible with Arduplane. Some use proprietary software like KISS, which is not supported. Generally, we recommend the following MCUs:
F405
F745
H743
If you don't intend to use Ardupilot, these MCUs are also suitable:
F411
F721
⚠️ This documentation is outdated! A current version is available at openhdfpv.org
The hardware.conf file in OpenHD allows advanced users and developers to override default configurations and camera setups when the normal setup via the graphical user interface (GUI) isn't sufficient. It contains critical settings for managing Wi-Fi, cameras, network interfaces, and some generic options. Here are the important sections and parameters you need to understand:
Description: Determines whether OpenHD should automatically detect and configure Wi-Fi cards.
Value: true (Automatic detection enabled) or false (Manual configuration).
Note: When set to false, manual configuration is required.
Description: Specifies the interface name(s) of the cards used for Wi-Fi broadcast.
Value: If WIFI_ENABLE_AUTODETECT is false, specify the interface name(s).
Note
Description: Defines the interface name of the card used for the Wi-Fi hotspot.
Value: Empty or specify the interface name.
Note: Ensure it does not conflict with cards used for wifibroadcast.
Description: Determines whether OpenHD should automatically detect and configure cameras.
Value: true (Automatic detection enabled) or false (Manual configuration).
Description: Specifies the number of cameras in use.
Value: 1 (Primary camera only) or 2 (Primary and secondary cameras).
Description: Defines the types of cameras to use when auto-detection is disabled.
Value: Choose from available camera types such as DUMMY_SW for emulated software cameras or other camera-specific options.
Note: The specific camera types are explained in the comments within the configuration file. For unmanaged Cameras the unmanagedCamera script needs to be edited, too
Description: Configures how OpenHD manages the Ethernet connection.
Value: RPI_ETHERNET_ONLY (default) or specify the interface name of your Ethernet card.
Note: Useful primarily on Raspberry Pi as a ground station.
Description: Specifies additional IP addresses to which OpenHD should forward video and telemetry data.
Value: Comma-separated list of IP addresses.
Note: Useful for manual network configuration.
Description: Controls whether OpenHD forwards video streams to localhost on ports 5800 and 5801.
Value: true or false.
Note
Description: Enables or disables writing the last known position (latitude and longitude) to a file for recovery purposes in case of a crash on the ground.
Value: true or false.
Note: Editing the hardware.conf file can have a significant impact on OpenHD's behavior and should be done with caution. Changes to this file may require a restart of OpenHD and can be overwritten during OpenHD updates. This file is typically located at /boot/openhd/hardware.conf on OpenHD images.
⚠️ This documentation is outdated! A current version is available at
While Arduplane is a perfect choice for building complex and advanced planes and copters with advanced mission capabilities, we do not recommend using it as a beginner. If you are familiar with the software or require advanced features like sensors and mission planning, it is still a suitable option.
Recommended Method: Utilize the hardware UART from your air unit (e.g., Raspberry Pi) and one hardware UART from your flight controller.
⚠️ This documentation is outdated! A current version is available at
NOTE: When adjusting the TX (transmit) power settings, it is your responsibility to adhere to the rules and regulations of your country.
OpenHD Evo provides the ability to configure the TX power of Wi-Fi cards that support runtime power adjustments. Additionally, RTL8812AU and RTL8812BU users can specify different TX power levels when the Flight Controller (FC) is armed or disarmed.
OpenHD Evo offers robust support for RTL8812AU and RTL8812BU Wi-Fi cards, allowing you to modify the "TX power index," a unitless value specifying the output power of the Wi-Fi chip before amplification Several important considerations apply:
⚠️ This documentation is outdated! A current version is available at
OpenHD offers two methods for recording your flight footage, whether for sharing on platforms like YouTube or for personal analysis.
Air recording involves capturing video locally on your Air unit. This method helps eliminate any potential breakups or interference that might occur during the flight, as it records directly from the transmitted video feed.
Note 1: The Raspberry Pi (RPI) hardware is not capable of recording video with an on-screen display (OSD). Please refer to option 2 for OSD recording.
falseNot Recommended: Use a USB cable on a flight controller that supports it (e.g., PX4).
Not Recommended: Use a USB-UART programmer.
UART telemetry is disabled in OpenHD by default. To enable it, use QOpenHD in the AIR(TMP) Settings registry (FC_UART_CONN) and select serial0. Be sure to choose the correct baud rate that matches your flight controller.
Connect the TX pin of the serial port on your flight controller to the RX pin on the Pi. Warning: The Pi uses 3.3V logic level on the serial ports, so ensure your flight controller also uses 3.3V. Connecting 5V may damage the Pi's serial port. Refer to the Pinout diagram for pinout details.
Ardupilot does not send telemetry without specifying the telemetry rates set by the user. In versions below 2.5, this needs to be manually set via the SRX parameters. In versions 2.5 and above, OpenHD handles this automatically.
You can choose different subsets of telemetry information and determine how often you want the Flight Controller (FC) to stream specific sets of data per second (defined in Hz). These parameters are known as SRx_Parameters, where x represents the serial ports using Mavlink in ascending order (e.g., SERIAL0, SERIAL2, SERIAL6 correspond to SR0_, SR1_, and SR6_).
To prevent transmitting telemetry data too frequently over the radio link, select necessary data subsets and find a balance between data update frequency and radio link usage. The following parameters are crucial:
Using the Config/Tuning -> Full Parameter Tree menu, modify the mentioned settings:
Save the settings and disconnect the Flight Controller.
SR1_ADSB=5
SR1_EXT_STAT=2
SR1_EXTRA1=4
SR1_EXTRA2=4
SR1_EXTRA3=2
SR1_PARAMS=10
SR1_POSITION=2
SR1_RAW_CTRL=0
SR1_RAW_SENS=2
SR1_RC_CHAN=2The actual TX power in milliwatts (mW) depends on the specific card you have, including any amplifiers it uses.
TX power indices are unitless values ranging from 0 to 63, with 63 representing the highest achievable output power for.
Caution: Selecting a TX power index that is too high and thereby feeding excessive power into the amplifiers on your card can result in damage. It is advisable to consult your card seller's website for specific guidance before adjusting the TX power. For ASUS card users, a range of 0 to 63 can generally be used safely.
High TX power settings require appropriate power supply and cooling. Refer to hardware recommendations for guidelines on powering your Wi-Fi cards.
TX power settings are local to your Air and Ground units. Adjust the air TX power under "OpenHD -> AIR" and the ground TX power under "OpenHD -> GND."
Excessive TX power indices at certain bitrates (MCS) can lead to overamplification and increased packet loss. Avoid using TX power indices of 53 or higher when flying with MCS 4 or higher. In general, TX power indices of <= 53 are recommended.
Default TX power settings: OpenHD Evo defaults to a TX power of <= 25mW (or a TX power index measured to commonly output <= 25mW) to comply with regulations. You may need to adjust the TX power settings manually after flashing OpenHD Evo to meet your specific requirements.
OpenHD allow the user to select a power index when the UAV is disarmed and automatically encrease the power when armed. To do this:
Click on "OpenHD" and then "LINK/QUICK", depending on if you want to edit air or ground click on "edit" on either of the two.
Once the menu is open select your wifi card on the dropdown menu ("Please Select") and then select the power when arm and disarm (dont forget to click "save") When all updated you can also see the power saved in the box below
Please note that the following power values apply only to ASUS AC56-USB Wi-Fi cards and may not be applicable to other cards:
TX Power Index 19: 10-12 mW
TX Power Index 25: 25-30 mW
TX Power Index 30: 45-50 mW
TX Power Index 35: 70-80 mW
TX Power Index 37: 100-110 mW
TX Power Index 40: 120-140 mW
TX Power Index 45: 200-230 mW
TX Power Index 50: 280-320 mW
TX Power Index 55: 380-400 mW
TX Power Index 58: 420-450 mW
Please note that the AC180 Cards from aliexpress behave very strange/different:
TX Power Index 20: low(ish power)
TX Power Index 22: medium(ish power)
TX Power Index 26: high power
TX Power Index 30: maximum(dangerous power)
NOTE: It is not possible to use these cards legally in most of the countries, so be cautious
Please be aware that while RTL8812AU/RTL8812BU cards are fully supported in OpenHD Evo with detailed power tables and guidance, other cards may function differently. It is advisable to exercise caution and perform testing when using non-RTL8812AU/RTL8812BU cards to ensure they operate as expected.
Due to hardware limitations of the Raspberry Pi, which cannot record both video and OSD simultaneously, we recommend the following user-proven alternative:
Use QOpenHD on a tablet or Android phone.
Employ a screen recorder (specific application to be determined) to capture the video feed along with OSD data.
If you have access to a (powerful) x86 laptop on the ground, you can also utilize its integrated screen recording capabilities, OBS is preinstalled on our images and recommended for perfect Hardware utilisation.
You can manage air recording by either manually enabling/disabling the recording of your primary or secondary camera via QOpenHD or by using the following recommended feature:
Record your flights locally on your air unit with minimal performance impact. The recorded video maintains the same bitrate as the transmitted video but is free from breakups due to packet loss since it's stored locally on your air unit, not the ground unit.
To enable this feature:
Enable video recording for a connected camera. You have two options or using the sidebar or the video statistic tab. You can set it to OFF, ON or Auto, in AUTO the system will start recording automatically when arm the UAV
To access and view the recordings, you have two options:
Option a: After a flight, remove the SD card from your air unit and insert it into a card reader. You can find the recordings in the partition named "RECORDINGS".
Option b: After a flight, enable the "Wi-Fi hotspot" on your air Pi (requires a Pi with integrated Wi-Fi). Connect your phone or PC to the Pi's Wi-Fi network, open a web browser, enter the Pi's IP address. You will access its web interface, where you can find the video files.
You will see a red dot next to camera icon and MBits
Note: If there is insufficient free space on your Air unit's SD card, air recording will automatically stop.
⚠️ This documentation is outdated! A current version is available at openhdfpv.org
Different to the working procedure of 2.0 in OpenHD evo is a lot more versatile. But some advanced features are not exposed in QOpenHD or not automatically enabled.
We differenciate a little in the way that we do not automatically enable the wifi-hotspot. And we also do not stream Video/Telemetry over wifi, but use it mostly for our Webinterface to download Recordings, or debug and SSH-Access.
The username is openhd The password is openhd
To enable the Wifi-Hotspot you need to enable it in Air(TMP) or Ground(TMP) The standart IP for the SBC is 192.168.3.1. The password is openhdopenhd
Sometimes the user may override protection-features like the wifi-hotspot being able to share Video/Telemetry or force OpenHD to send Video/Telemetry to a specific IP. This can be done in the hardware.conf on the SD-Card.
⚠️ This documentation is outdated! A current version is available at
In OpenHD, you have the flexibility to dynamically change your MCS (Modulation and Coding Scheme) index, which directly affects your video bitrate and maximum range, during your flight. By increasing the MCS index, you can boost your available bitrate at the cost of reduced range, and vice versa. This feature is particularly useful for optimizing your FPV experience based on your current needs and conditions.
To change the MCS index during flight in OpenHD Evo, ensure the following prerequisites are met:
Using the Wi-Fi Hotspot in OpenHD Evo
⚠️ This documentation is outdated! A current version is available at
As of now, OpenHD Evo does not offer specific setup options for configuring the Wi-Fi hotspot. However, you can connect to the hotspot with the following default credentials:
SSID (Network Name): openhd


USB-Tethering (Passive)
YES
YES
YES
YES
YES
Wifi-Hotspot
YES
Yes
NO
NO
NO
Ethernet-Tethering (Active)
YES
YES
YES
YES
NO
Ethernet-Tethering (Passive)
YES
YES
YES
YES
YES
Password: openhdopenhd
Important Notes:
To use the web interface (webui) within the Wi-Fi hotspot, you must disable your mobile data connection on your device to ensure it connects to the hotspot correctly.
Warning: Using the Wi-Fi hotspot will not give you telemetry and video, but is only there for debugging and the webui.
Warning: Using the Wi-Fi hotspot may interfere with your overall communication range. Exercise caution and deactivate the hotspot when not in use to avoid impacting your connection to the drone.
Your camera supports variable bitrate, as OpenHD can adjust your camera's encoder bitrate.
Your Flight Controller (FC) reports your RC (Radio Control) channels to OpenHD, which is commonly supported by ArduPilot-based setups.
You can adjust the MCS index during your flight using the QOpenHD interface on a touch screen. However, when using directional antennas, it may not be practical to make parameter changes on your Air unit when it is far from you or at maximum range.
To address the limitations of Method 1, OpenHD allows you to configure your RC so that you can change the MCS index via a specific channel from your RC transmitter. This enables you to make real-time adjustments even when your aircraft is at the edge of its range or under challenging conditions.
Follow these steps to set up the MCS index adjustment via your RC channel switch:
Ensure you have a free channel available on your RC transmitter that can be transmitted over your RC link. This setup works with both RC connections over OpenHD and other RC links like ExpressLRS, Crossfire, etc. The use of alternative RC links is recommended for long-range flights. For this example, we'll use Channel 9.
Verify that your RC channels are forwarded from the Flight Controller (FC) to the OpenHD Air unit. You can check this by going to QOpenHD, navigating to RC -> FC CHANNELS DEBUG, and confirming that moving channel 9 corresponds to channel 9 movements.
In the OpenHD interface on your Air unit, go to OpenHD -> AIR and change the setting MCS_VIA_RC from "DISABLED" to your selected channel (in this case, Channel 9).
Now that you've completed the setup in OpenHD, you need to transmit the correct PWM (Pulse Width Modulation) values depending on your RC switch configuration. Here's the mapping in OpenHD:
For users with a 2-position switch, it is recommended to configure the switch on your RC as follows:
Low Position: MCS1 (Approximately 1300 PWM)
High Position: MCS3 (Approximately 1700 PWM)
If you are using a 3-position switch, consider the following configuration:
Low Position: MCS1 (Approximately 1300 PWM)
Medium Position: MCS2 (Approximately 1500 PWM)
High Position: MCS3 (Approximately 1700 PWM)
MCS 3 typically strikes a balance between range and image quality, making it a good choice for general use. MCS 1 can serve as a backup with significantly reduced image quality but greater range. Of course, you can configure different PWM values to suit your preferences and requirements.
⚠️ This documentation is outdated! A current version is available at openhdfpv.org
To ensure you don't have surprise shutdowns on your Ground unit, it can be very convenient to monitor the Voltage and Current that are supplied to the system in the OSD
INA219 - Simple and efficient Using the INA219 modules, readily available from sources like AliExpress is a simple and efficient way to add Ground Power monitoring. The module is easy to attach to the Ground unit using I2C. The following pictures and diagrams should be all you need. If the system finds the device attached it will automatically enable the functionality.
By default is OFF you need to turn on the widget on the OSD tab, its called "Show ground battery"
Guide for Air Recording without OSD for YouTube or similar platforms.
⚠️ This documentation is outdated! A current version is available at openhdfpv.org
Record your flights locally on your air unit with minimal performance impact. The recorded video maintains the same bitrate as the transmitted video but is free from breakups due to packet loss since it's stored locally on your air unit, not the ground unit.
To enable this feature:
Enable video recording for a connected camera. You have two options or using the sidebar or the video statistic tab. You can set it to OFF, ON or Auto, in AUTO the system will start recording automatically when arm the UAV
To access and view the recordings, you have two options:
Option a: After a flight, remove the SD card from your air unit and insert it into a card reader. You can find the recordings in the partition named "RECORDINGS".
Option b: After a flight, enable the "Wi-Fi hotspot" on your air Pi (requires a Pi with integrated Wi-Fi). Connect your phone or PC to the Pi's Wi-Fi network, open a web browser, enter the Pi's IP address. You will access its web interface, where you can find the video files.
You will see a red dot next to camera icon and MBits
⚠️ This documentation is outdated! A current version is available at
To establish a connection between OpenHD and QGroundControl over Wi-Fi or Ethernet, follow these steps:
The Wifi hostpot is by default ON when disarm and OFF when arm because the possible interference, you can change it using the sidebar, if you want to use Ethernet just connect the ethernet cable


Next power on your Air- and GroundPi
Enter in the Ground tab and here change the settings "Ethernet" from disable to Hostpot or forward+internet, the last one is very handy to give internet to the pc from your phone
Now lets continue in QgroundControl:
Navigate to the "Comm Links" tab within QGroundControl and click on "Add" located in the lower part of the screen.
Fill in the following parameters:
Name: Enter a name for the connection, e.g., "TCP OpenHD".
Automatically Connect on Start: Check this option.
Type: Select "TCP".
Server Address: Input "192.168.3.1".
Port: Set the port to "5760".
Click "OK" to confirm.
Click on "Connect" and wait for telemetry data to be received, which typically takes around 5 seconds, don't go on with the next step until you are connected.
At this point, telemetry data should be available, but video may not be. Follow these steps to resolve this:
Select "UDP" as the source and set the port to "5600".
By following these steps, telemetry data and video feed should now be accessible within QGroundControl. Enabling the "Automatically Connect on Start" option eliminates the need to reconnect during subsequent program launches.


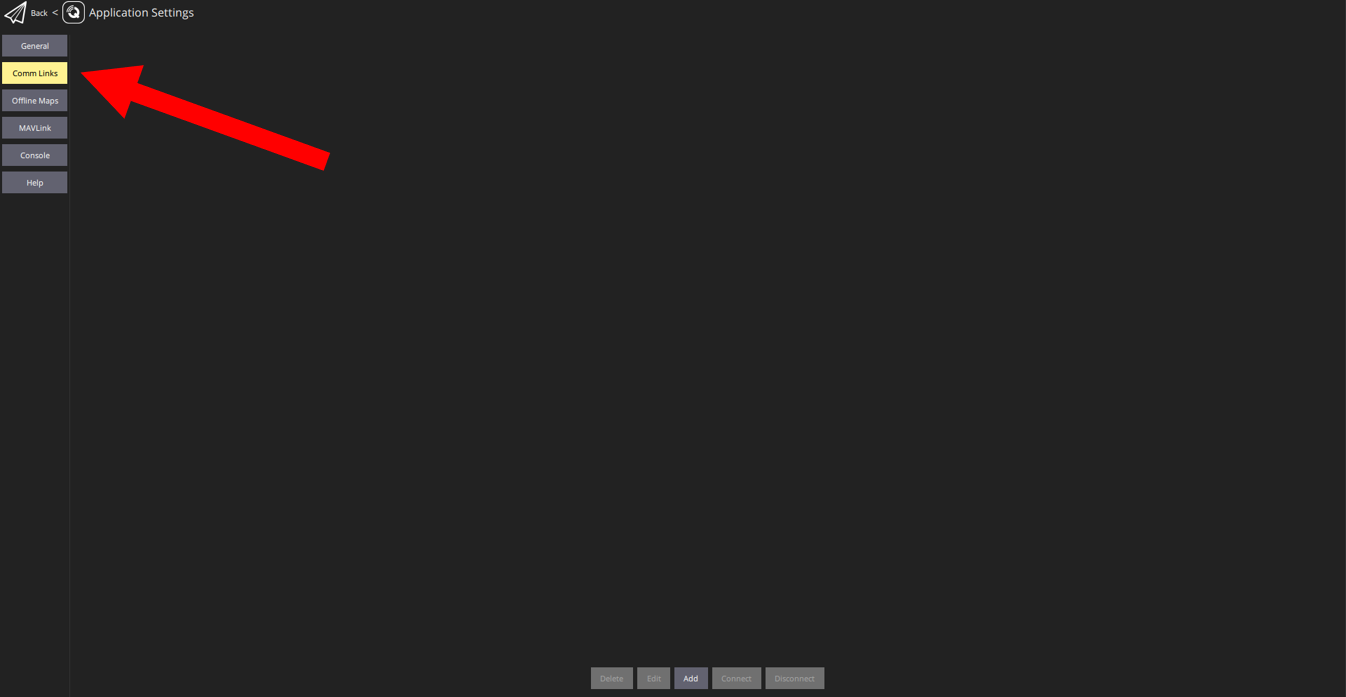
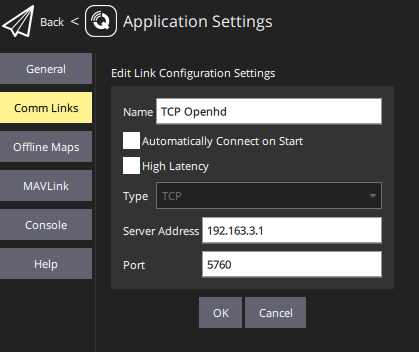


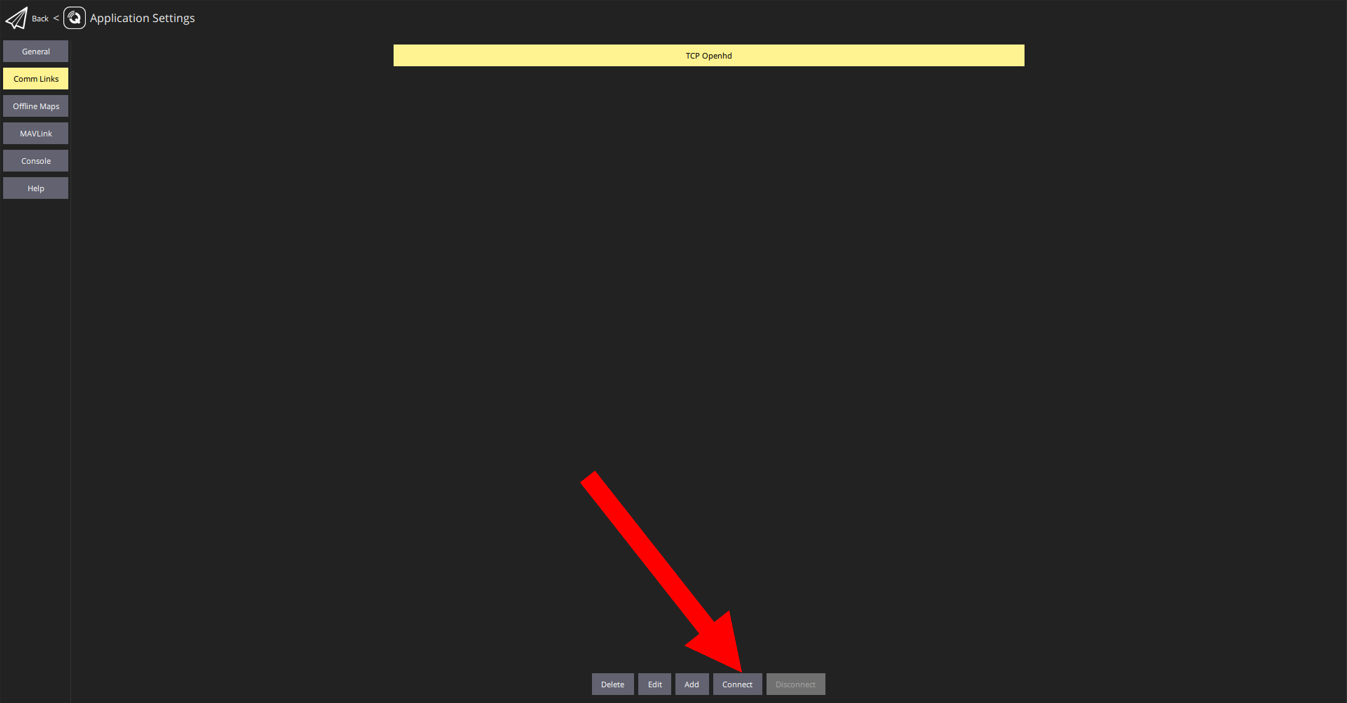

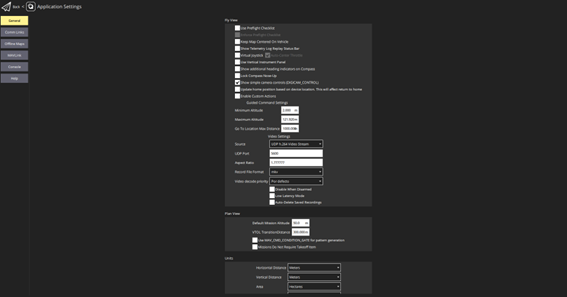
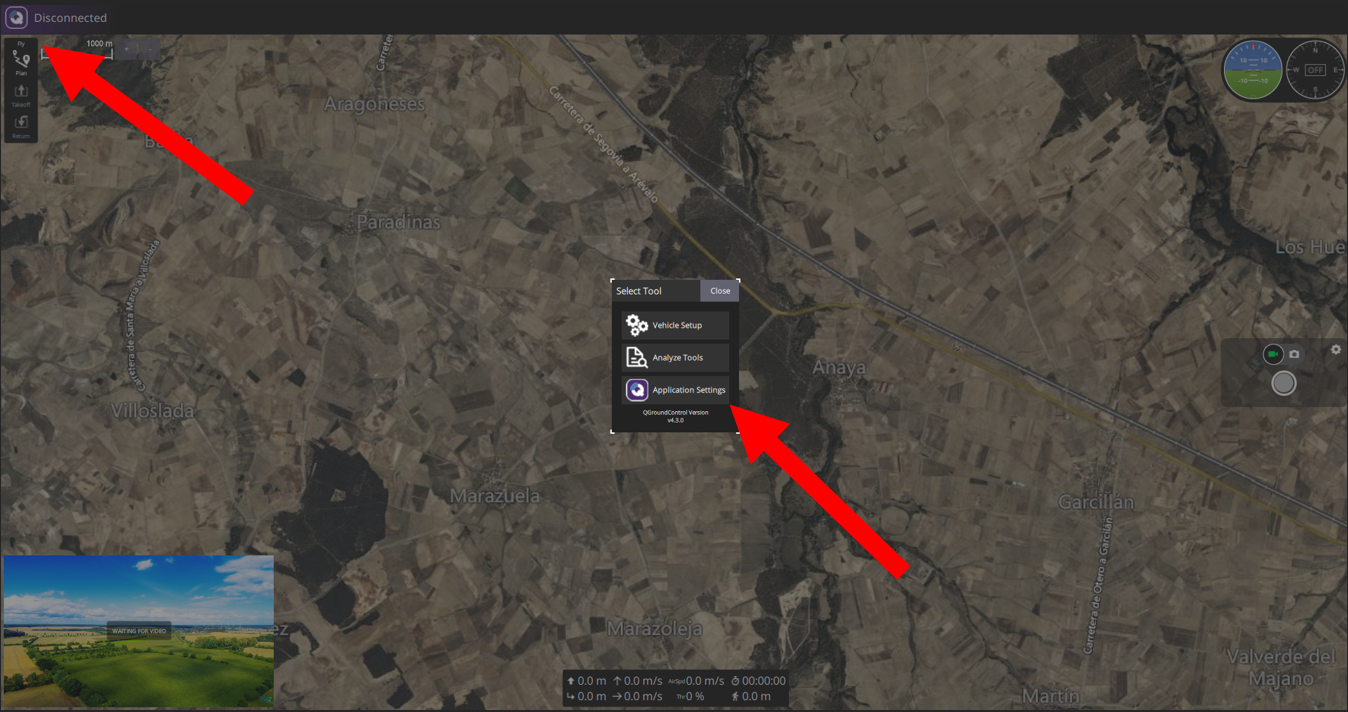